neo12345
Well-Known Member
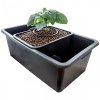
The Brummie Bubbler is a drip fed DWC system, the name is supposedly to have come from the original company making these posting most of them to the Birmingham area of the UK.

To build this system you will need the following items, these can be bought separately or as a kit from good hydroponic shops for around £50.
1 x 90L Black plastic utility tank
1 x 15L Subsurface tray
1 x Mimouse water pump
1 x Twin outlet air pump
2 x 50mm Round air stones
2 x 1m 4mm Air line
1 x 15L Clay pebbles
1 x 1m of 13mm flexi hose
1 x 13mm T joint
1 x 13 Elbow joint
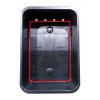
Start by drilling holes in the bottom of the smaller 15L subsurface tray (inside red area), you will need lot's of holes all over the bottom of the tray for the roots to grow through. Use a drill bit that is smaller than the size of the clay pebbles as you don't want them falling through the holes, I think clay pebbles are 8-10mm so I used a 6.5mm drill to drill my holes.

I also drilled a line of holes along the base of the container, and you can drill as many holes as you like but the idea is to encourage your roots to grow downwards towards the nutrient solution. Trust me by the time you drilled the base you won't want to start drilling the sides too!
Once the holes have been drilled take the tray outside and fill with clay pebbles, give these a very good rinse with a hosepipe as you will get a lot of grit and dust come out of the bottom. Flush with clean water until it starts running clear. If the wife is not at home this can be done in the kitchen sink or bath, I did hear about someone washing the clay pebbles in the washing machine but you could be in big trouble if she comes home early and catches you doing this!!
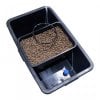
Fill with pebbles but not right to the top, leave some space so that the pebbles don't wick water out of the system and onto your floor! Your tank should now look like this but the smaller tray will be full of pebbles:

Now place the water pump on the bottom of the 90L tank, and cut a length of the 13mm hose that will run from the pump and up to the drip ring. Cut this a couple of inches longer than you think you will need, it can be adjusted afterwards but you can't add hose back on if you cut it too short! It's useful at this stage to get a bowl of hot water to dip the ends of the 13mm pipe in as the pipes slip on to the fittings much easier, and it helps to mold the drip ring.
Attach the pipe to the water pump and fit the 90 degree elbow at the other end, then make the drip ring by softening up a length of 13mm pipe in water and use the 13mm T joint to create a circle for the drip ring. The drip ring will need to be drilled on one side with a 3mm drill bit to allow the water to drip, I drill the holes approx 1" apart.
Then attach the drip ring to hose coming from the pump with a small section of 13mm pipe. The dripper system is open to modification, which is the first thing I did as I saw a better way of doing it but I will go in to more detail later.
Drop in your air stones and your system should now look something like this:

Fill the system with water to just underneath the tank with the clay pebbles, and you're ready to switch on the water pump and air pump to check everything is working fine. The dripper ring should be dripping water on to the clay pebbles and the airstones should be bubbling away, it's worth checking the airstones are working correctly as I've had a few that were blocked on one side.
That's it, you are ready to roll. I'll add some hints and tips and show a grow using this system, and will welcome any questions.

To build this system you will need the following items, these can be bought separately or as a kit from good hydroponic shops for around £50.
1 x 90L Black plastic utility tank
1 x 15L Subsurface tray
1 x Mimouse water pump
1 x Twin outlet air pump
2 x 50mm Round air stones
2 x 1m 4mm Air line
1 x 15L Clay pebbles
1 x 1m of 13mm flexi hose
1 x 13mm T joint
1 x 13 Elbow joint
Start by drilling holes in the bottom of the smaller 15L subsurface tray (inside red area), you will need lot's of holes all over the bottom of the tray for the roots to grow through. Use a drill bit that is smaller than the size of the clay pebbles as you don't want them falling through the holes, I think clay pebbles are 8-10mm so I used a 6.5mm drill to drill my holes.

I also drilled a line of holes along the base of the container, and you can drill as many holes as you like but the idea is to encourage your roots to grow downwards towards the nutrient solution. Trust me by the time you drilled the base you won't want to start drilling the sides too!
Once the holes have been drilled take the tray outside and fill with clay pebbles, give these a very good rinse with a hosepipe as you will get a lot of grit and dust come out of the bottom. Flush with clean water until it starts running clear. If the wife is not at home this can be done in the kitchen sink or bath, I did hear about someone washing the clay pebbles in the washing machine but you could be in big trouble if she comes home early and catches you doing this!!
Fill with pebbles but not right to the top, leave some space so that the pebbles don't wick water out of the system and onto your floor! Your tank should now look like this but the smaller tray will be full of pebbles:

Now place the water pump on the bottom of the 90L tank, and cut a length of the 13mm hose that will run from the pump and up to the drip ring. Cut this a couple of inches longer than you think you will need, it can be adjusted afterwards but you can't add hose back on if you cut it too short! It's useful at this stage to get a bowl of hot water to dip the ends of the 13mm pipe in as the pipes slip on to the fittings much easier, and it helps to mold the drip ring.
Attach the pipe to the water pump and fit the 90 degree elbow at the other end, then make the drip ring by softening up a length of 13mm pipe in water and use the 13mm T joint to create a circle for the drip ring. The drip ring will need to be drilled on one side with a 3mm drill bit to allow the water to drip, I drill the holes approx 1" apart.
Then attach the drip ring to hose coming from the pump with a small section of 13mm pipe. The dripper system is open to modification, which is the first thing I did as I saw a better way of doing it but I will go in to more detail later.
Drop in your air stones and your system should now look something like this:

Fill the system with water to just underneath the tank with the clay pebbles, and you're ready to switch on the water pump and air pump to check everything is working fine. The dripper ring should be dripping water on to the clay pebbles and the airstones should be bubbling away, it's worth checking the airstones are working correctly as I've had a few that were blocked on one side.
That's it, you are ready to roll. I'll add some hints and tips and show a grow using this system, and will welcome any questions.


