How to Vent your Grow Area Correctly (all varibles accounted)
- Thread starter justugh
- Start date
bravedave
Well-Known Member
I actually do have a small window unit available. Is there a picture somewhere of how you are sealing and ducting this. As to the other...ice would be no problem for me and would only need to ice a small % of the time.The hot part is outside. I use a window unit (cheap, 5200 BTU) I sealed up and duct to the grow tent.
Red1966
Well-Known Member
You're in luck! I'm in the middle of making some improvements to it and have it opened up right now. I'll take some pictures of it and post them for you later tonight or tomorrow. The model I got is not the best for it, so this will be kind of a worst-case scenario. I should warn you the the built-in fan on them won't suffice to push the air through the two 15ft flexible ducts I use to connect them to the grow tent. I did use two 6" in line fans, but the improvements I'm making may let me get away with just one.
AlaskaHashMan
Active Member
Yeah I guess my only experience is with a non window unit that just promoted to much heat off the back of the thing. Or maybe it was a window unit we didn't have access to a window with. I can't remember very well. Sounds like plumbing the cold air to your tent would be a great way to go.The hot part is outside. I use a window unit (cheap, 5200 BTU) I sealed up and duct to the grow tent.
Red1966
Well-Known Member
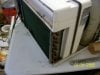
Yes, I found that using a in-line fan on each duct gives you a neutral air pressure inside the A/C so you get little leakage. You will want to put a speed controller on them because running full blast is just too much. Run both off the same controller so they run at the same speed and use identical fans. I wanted to improve the sealing . The Great Stuff foam is curing right now. With two bare 600w bulbs the 5,200 A/C runs nearly constantly and bings the humidity in my 4 x 8 tent below 14% (lowest reading on my hygrometer), so you'll need to air cool your lights, unless you use LEDs. I saw a 9,000 BTU LG unit at Home Depot that has a plastic shroud instead of the foam one my Kenmore unit has. This should be easier to seal up, or may not need sealing at all. I suggest you test the unit first if you buy one. I'm pretty sure the modifications will void the warranty. You will need to run the two fans constantly so the thermostat works correctly, or control it with an external thermostat like a Sentinel CHHC-4. If you connect your filter to it, you kill two birds with one stone.
Red1966
Well-Known Member
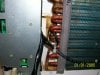
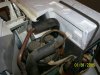
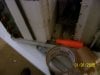
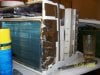
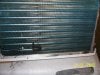
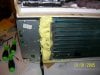
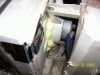
As you can see, the shroud is made of three shaped Styrofoam blocks. I taped the bottom and middle blocks together on the inside to seal the seams. The middle and top are taped together on the outside. One end of the evaporator is sealed with the tape (pic 6), the other with foam (pic eight[substitutes a smilely face?]). See the orange-handled screwdriver (pic 4)? The shank is in the outlet for condensate. You don't want to block that. I found there is a way over sized hole the motor shaft goes thru. I sealed that with foam, too (pic 09). Spin the shaft before the foam hardens so it doesn't lock it in place. There is tape sealing the front bottom edge, too (pic 7). I made a box with internal dividers and foam tape for seals to match the front of the A/C (pics 10 & 11). Pic 12 shows it all assembled and in the window.
Attachments
-
 619.9 KB Views: 29
Last edited:
Red1966
Well-Known Member
Well only one pic showed up. I'll post them again.
Attachments
-
 658.4 KB Views: 61
 -
 469.4 KB Views: 65
 -
 691.5 KB Views: 62
 -
 715.9 KB Views: 60
 -
 605.7 KB Views: 61
 -
 585.7 KB Views: 62
 -
 559.6 KB Views: 61
 -
 591.1 KB Views: 64
 -
 584.7 KB Views: 63
 -
 632.2 KB Views: 56

Red1966
Well-Known Member
Check the LG 9,000 BTU. It maybe a lot easier to seal. Hell. It may not need anything. Making the box on the front is the hardest part, and its not that hard. Assemble it with screws and glue, so it will be airtight........Use the foam meant for seal doors and windows. It doesn't expand as much, stays flexible, and won't push everything all out of position as it expands.
Last edited:
JazzyLady
Well-Known Member
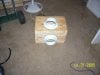
This is just amazing. Made two of them.. one for my grow room... one for my art studio that had no air conditioning! SO NICE! I did make one little mod. I got the replacement mats for regular swamp coolers and dipped them in water and put the wet material around the bottles. As the bottles sweat, it keeps the fiber cold making the AC work a lot better!Redneck AC?
JazzyLady
Well-Known Member
I got brave and started doing research. This is always dangerous... but.. I found something truly amazing. I made a swamp cooler from a bucket!!! I found this information on a Burning man page.
Parts List:
Tools needed:
Parts List:
- 1x 5 gal bucket (Think Home Depot)
- 1x 5 gal bucket lid ( $1 at home depot)
- You may also need a "sacrificial" 5 gal bucket that will be cut into strips to use as a retainer ring to hold the pads in place. One bucket should make at least 4 2" strips, so one sacrificed bucket will do for four swamp coolers, so going in with friends means less waste.
") An improvised alternative is fine, too, this is not a precision venture.
An improvised alternative is fine, too, this is not a precision venture.
- 1x Swamp Cooler Mesh Pad: $8.77 for the Home Depot "DuraCool" 30x36 pad will make at least two coolers. I only made one cooler and used the Dura Cool pad under my current crop of seedlings.
- ~4 feet of Poly Tube 1/2" Irrigation Tube :
- 1/2" Irrigation tube T connector ($1.50 at Home Depot)
- ~2 feet of Garden Shade Cloth, 6' wide: Home Depot, OSH, Lowes, all carry it
- one 4 inch fan.
- Fountain Pump: 40-80 gal per hour rating, needs to lift at least 2' ( ~$14-20 )
- Flexible conduit to direct cooled air: Cost and type varies. (Standard 4" dryer conduit is about $5-6 at Home Depot and should work pretty well. Also 8" insulated conduit would work well.) This really depends on your needs, and how you want to channel the air. If your conduit doesn't match the shape of the fan, you need some sort of duct to funnel the air.
- Misc parts needed: Possibly some wire for power, some car cigarette plugs to connect the power, etc. $15-20 tops, if you're careful or already have stuff, less.
Tools needed:
- Regular Drill to drill the bucket holes and fan mount holes
- Common size drill bits for fan mounting
- 2" Hole Cutter Bit for Drill ($5 at Harbor Freight) for bucket vent holes
- Box Knife to cut poly hose and bucket lid
- Scissors to cut shade cloth
- Screwdriver to screw in fans
- Maybe some basic soldering tools, or wire nuts to connect two wires
JazzyLady
Well-Known Member
BUILD INSTRUCTIONS:
Full credit to FigJam for adapting this original playa-tested design to the small 5 gal. form factor.
Full text instructions:
1) Buy the stuff
2) Add 2 gallons of water to the bucket to establish a high water mark. Use a sharpie to draw a line around the outside. (I drew one line at 1 gal, and another at 2. It made me happy.) Keeping about 1" above that fill line, and below the top reinforcement ring that's about 2" below the top, drill as many holes into the bucket as you reasonably can. The photo shows this being done using a 2" hole drill bit. I didnt have a 2 inch bit, I used a 1.5 inch bit. It really doesnt matter, you just need holes to allow air to pass through, while still leaving it structurally viable!

3) Cut the shade cloth to a 13" x 6' strip with scissors. This will roll up in a tube, covering the inside of the bucket and acting as an air filter. The 6' length will give you, essentially, a double-layer filter inside.


4) Cut the swamp cooler pad with scissors to 13" x 30". Coil it inside the bucket, and trim as needed to it fits nicely. You'll want to cut a slight wedge off one side since the bucket is a little smaller at the bottom than at the top. About 1" off at the bottom, angled towards the top edge, should give it just the right slight cone shape.


5) Cut about 4' of irrigation tubing off to work with. Cuts pretty easily by slicing as if it were cheese, using a simple box cutter. Use the T-coupler to make a coil that just fits inside the top of the bucket, about 1" down from the edge of the top. The rest of the 4' section will go from the center exit of the T-coupler toward the bottom of the bucket... it should slide right over the output of the fountain pump.


6) Put the fountain in the bottom of the bucket and make sure the tube leading down from the irrigation tube ring is the right length. Trim as needed. Route the power cable for the fountain behind the shade cloth and out one of the big air holes we drilled in step 2.


7) Using a small drill bit (1/16" is about right), drill holes roughly every 2" in the bottom of the irrigation tube ring (no need for precision, it doesn't matter). This will allow water to squirt down onto the cooler pad, keeping it wet, so the evaporation take place properly. NOT the tube going down to the pump, of course, just the ring itself.


") Now we turn to the computer fans. Place a fan on the bucket lid, right against the edge but inside the top "ring"/ridge around the edge. You do need to be right against the edge or you won't be able to fit both fans side-by-side across the lid. Using a small drill bit or even a thin pen, mark the four holes at each corner of the fan. Use a drill bit that fits comfortably inside the fan's mounting holes to drill starter holes. (Not too big, not too small) I think I used a 1/8" drill bit. I didn't even use a drill, the plastic is very soft. By starting the holes with a 1/16" bit, I easily hand-twisted the bit right through the plastic, checked with the fan to make sure everything lined up right on all four holes, then enlarged the holes with the bigger drill bit, again, just by twisting the bare bit in the hole, by hand.
Now we turn to the computer fans. Place a fan on the bucket lid, right against the edge but inside the top "ring"/ridge around the edge. You do need to be right against the edge or you won't be able to fit both fans side-by-side across the lid. Using a small drill bit or even a thin pen, mark the four holes at each corner of the fan. Use a drill bit that fits comfortably inside the fan's mounting holes to drill starter holes. (Not too big, not too small) I think I used a 1/8" drill bit. I didn't even use a drill, the plastic is very soft. By starting the holes with a 1/16" bit, I easily hand-twisted the bit right through the plastic, checked with the fan to make sure everything lined up right on all four holes, then enlarged the holes with the bigger drill bit, again, just by twisting the bare bit in the hole, by hand.
9) Now we cut the hole in the lid for the fan. Hold the fan in place so you can see the holes are in the right place. Take a pen or sharpie and draw a rough square, well-inside the fan's circular fan part. Make sure it's not too big and you have plenty of "corner" left for the screw holes to stay in place. Now take a standard box cutter knife (Stanley utility knife) and just cut the soft plastic square out. Check with the fan placement again, and using the knife, carefully enlarge the hole by carving out the soft plastic until you have a hole just big enough to have a clear air passage, and still have plenty of plastic at the corners to hold the fan. Be especially careful along the edge that's in the middle of the lid... you need an intact strip of plastic between the two fans to keep the lid structurally strong.

10) Once you've cut the hole and you're happy with it, mount the fan into the lid. (The fans come with screw for this) They screw from the bottom of the lid into the lower corner hole of the fan.

11) Repeat for fan #2. If you want a second fan, just be sure there is a space between fans to keep the lid structurally strong. When I made mine, I did not opt for a second fan. I bought a desk fan that plugs into the wall and removed its first basket, then screwed the basket cover to the lid using nylon wire clamps. They are little strips of nylon that have a hole to put a tiny screw into. I used this and tiny screws and nuts and then.. because I can... superglued the screws and nuts and fan case to the Home Depot bucket lid.

12) Add 2 gallons of water, connect the fans and pump to power and watch it go! Make sure there are no leaks. You may want a planter dish from a nursery to catch any drippings from the bucket. Fine-tune the position of the holes drilled into the poly irrigation line if needed... it shouldn't be a big deal to cut a new ring if needed, the stuff is cheap after all, and coming in 50' quantities, you have lots!


13). Attach with silicon sealant, or get creative! (Photos of some ideas to come)
14) Enjoy! Remember, swamp coolers are only effective in climates with very low humidity. Because I live in Las Vegas... super desert... I have a constant struggle with low humidity.
If you have any questions, feel free to drop me a line.
Full credit to FigJam for adapting this original playa-tested design to the small 5 gal. form factor.
Full text instructions:
1) Buy the stuff
2) Add 2 gallons of water to the bucket to establish a high water mark. Use a sharpie to draw a line around the outside. (I drew one line at 1 gal, and another at 2. It made me happy.) Keeping about 1" above that fill line, and below the top reinforcement ring that's about 2" below the top, drill as many holes into the bucket as you reasonably can. The photo shows this being done using a 2" hole drill bit. I didnt have a 2 inch bit, I used a 1.5 inch bit. It really doesnt matter, you just need holes to allow air to pass through, while still leaving it structurally viable!
3) Cut the shade cloth to a 13" x 6' strip with scissors. This will roll up in a tube, covering the inside of the bucket and acting as an air filter. The 6' length will give you, essentially, a double-layer filter inside.
4) Cut the swamp cooler pad with scissors to 13" x 30". Coil it inside the bucket, and trim as needed to it fits nicely. You'll want to cut a slight wedge off one side since the bucket is a little smaller at the bottom than at the top. About 1" off at the bottom, angled towards the top edge, should give it just the right slight cone shape.
5) Cut about 4' of irrigation tubing off to work with. Cuts pretty easily by slicing as if it were cheese, using a simple box cutter. Use the T-coupler to make a coil that just fits inside the top of the bucket, about 1" down from the edge of the top. The rest of the 4' section will go from the center exit of the T-coupler toward the bottom of the bucket... it should slide right over the output of the fountain pump.
6) Put the fountain in the bottom of the bucket and make sure the tube leading down from the irrigation tube ring is the right length. Trim as needed. Route the power cable for the fountain behind the shade cloth and out one of the big air holes we drilled in step 2.
7) Using a small drill bit (1/16" is about right), drill holes roughly every 2" in the bottom of the irrigation tube ring (no need for precision, it doesn't matter). This will allow water to squirt down onto the cooler pad, keeping it wet, so the evaporation take place properly. NOT the tube going down to the pump, of course, just the ring itself.
9) Now we cut the hole in the lid for the fan. Hold the fan in place so you can see the holes are in the right place. Take a pen or sharpie and draw a rough square, well-inside the fan's circular fan part. Make sure it's not too big and you have plenty of "corner" left for the screw holes to stay in place. Now take a standard box cutter knife (Stanley utility knife) and just cut the soft plastic square out. Check with the fan placement again, and using the knife, carefully enlarge the hole by carving out the soft plastic until you have a hole just big enough to have a clear air passage, and still have plenty of plastic at the corners to hold the fan. Be especially careful along the edge that's in the middle of the lid... you need an intact strip of plastic between the two fans to keep the lid structurally strong.
10) Once you've cut the hole and you're happy with it, mount the fan into the lid. (The fans come with screw for this) They screw from the bottom of the lid into the lower corner hole of the fan.
11) Repeat for fan #2. If you want a second fan, just be sure there is a space between fans to keep the lid structurally strong. When I made mine, I did not opt for a second fan. I bought a desk fan that plugs into the wall and removed its first basket, then screwed the basket cover to the lid using nylon wire clamps. They are little strips of nylon that have a hole to put a tiny screw into. I used this and tiny screws and nuts and then.. because I can... superglued the screws and nuts and fan case to the Home Depot bucket lid.
12) Add 2 gallons of water, connect the fans and pump to power and watch it go! Make sure there are no leaks. You may want a planter dish from a nursery to catch any drippings from the bucket. Fine-tune the position of the holes drilled into the poly irrigation line if needed... it shouldn't be a big deal to cut a new ring if needed, the stuff is cheap after all, and coming in 50' quantities, you have lots!
13). Attach with silicon sealant, or get creative! (Photos of some ideas to come)
14) Enjoy! Remember, swamp coolers are only effective in climates with very low humidity. Because I live in Las Vegas... super desert... I have a constant struggle with low humidity.
If you have any questions, feel free to drop me a line.
Squidbilly
Well-Known Member
Each 90degree bend in your ducting is equivalent to 10' of straight ducting, so it reduces your cfm a lot. Actually, don't quote me on that, but it's something like 10', might even be more then that, so yeah 90 degree bends should be avoided whenever possible.How do the properties of air flow work? I'm curious whether at 90 degree angle will lower your final cfm output more or less than a gradual run to make the angle.
My temps are down four degree's just by pulling fresh outside air into my room(not my tent)
I have a four inch inline directly attached to my hood for outtake via 6"to 4" flange. With a 10" inline fan in the bottom corner for intake.
Soon I'll have to hook my 4x8 phresh filter up again so that will have to be planned in. Last time I used it as a scrubber just attached to the 4" fan. But now my girls are going to be way to big to run that little filter as a scrubber. going to have to put it on the out going air.
Squidbilly
Well-Known Member
You guys are forgetting one of the most overlooked areas in ventilation!
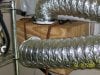
USE HARD STRAIGHT DUCTING WHENEVER POSSIBLE. Flex duct sucks and reduces cfm like crazy, every one of those ribs creates resistence/drag so if your having some issues, or your want a little extra omph from your exhaust or intake, try running hard ducting whenever possible, and flex only where you absolutely need it(like bends or connected to your adjustable hoods)
USE HARD STRAIGHT DUCTING WHENEVER POSSIBLE. Flex duct sucks and reduces cfm like crazy, every one of those ribs creates resistence/drag so if your having some issues, or your want a little extra omph from your exhaust or intake, try running hard ducting whenever possible, and flex only where you absolutely need it(like bends or connected to your adjustable hoods)