rollonesmokeone
Member
NOT MY POST!!!!!!!!!!!!!![TABLE="class: tborder vbseo_like_postbit, width: 100%, align: center"]
[TR]
[TD="class: alt1, bgcolor: #F5FFF7"]
I have recently decided to build a grow box that measures 5'x2'x2' to stick in my closet. Now that I live in the wonderful state of California, it is legal with proper documentation, so why not? My intentions of this post are to inspire people with my ideas just as other peoples posts have done to me. Enjoy!
The first step I took before going out and buying materials, was to determine exactly what I needed to minimize cost by not purchasing any more than I had to. I did this by using a free program downloaded from Google called Google Sketchup. I highly recommend it. I have had much success in designing a mini-bar that I had also constructed. This let me build the box in
3D and to scale using the handy tape measure tool it comes with. The program is very easy to use too. It took me less than a day to get a basic understanding of it. The total for all the wood used for this box was $52 at home depot.
Lumber list.
2 - MDF sheets. 4' x8' x 1/2" $18.99 each
7 - 2" x 2" x 8' pieces $1.55 each
Optional items (well worth it if budget permits)
4 - Caster Wheels $3.79 each
16 - Bolts, Nuts, Washers (1/4") about $5
Thats it. I already had wood screws. I used 2.5" all purpose screws for the frame and 1.25" #10 wood screws to attatch the MDF to the frame. I printed up a template for the cuts needed to be made to the MDF and the dude at Home Depot cut it for me. 6 pieces total, 3 pairs of the same size pieces. Living in an apartment, this would have been difficult. I cut the 2" x 2" pieces myself.
I had originally planned to make the box only 4' tall but wasn't sure if that would be enough room. However, a 4' tall box would only require one piece of MDF almost cutting the price of the box in half.
I would be more than happy to hook anyone up with the file of my plans if you decide to download Google Sketchup since it is needed to view them. Here you can rotate it in 3D and take and view measurements yourself inside and out.
MDF pieces are:
1'11" x 4'11" (x2) front panels
2' x 5' (x2) side panels
2' x 1'11" (x2) top and bottom panels
As far as the 2"x2" cuts go here they are:
2"x2"
-----------------
1'8" (19") x12
5" (60") x4
On with the pics! I like pics when checking out other peoples post so I decided to return the favor. Unfortunately, the only camera I have is on my cell phone so bear with me.
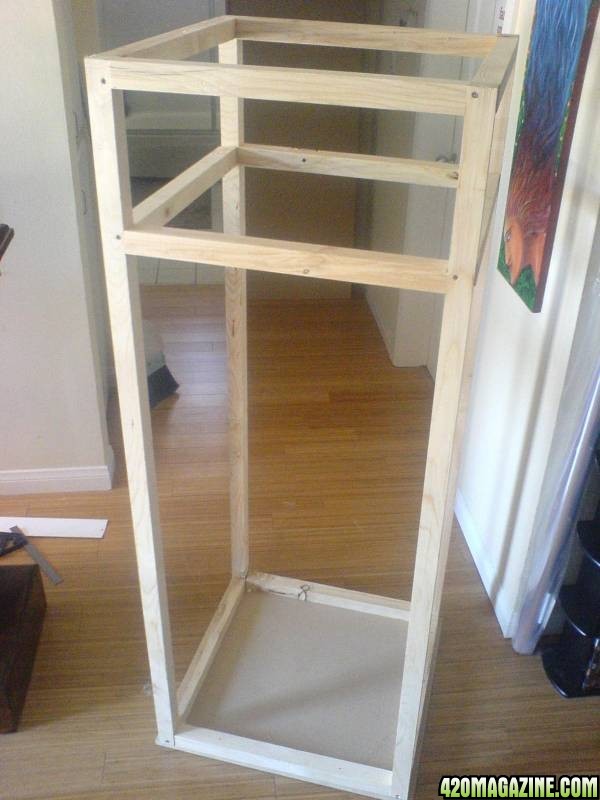
Here is the base assembled. Two of the 2x2's are flush with the edge and the other two have a half inch gap for the fron and back panles to rest on. The sides will be flush with the ground. It will make sense if it doesn't now if you see the Sketchup file.

Part of the frame assembled. Depending on how much room you want to leave for the lights determines how far from the top the second cross piece is attached. I will be leaving roughly a foot of space because I want to put a piece of glass or plexi to isolate the light from the chamber. I will be giving the light its own ventilation independant of the grow chamber.

The frame is almost complete

Next I attached the two frame peices to eachother

After that, the frame is ready to be inserted and attached to the base


The side panels are now ready to be attached. However, I have chosen to put some mylar ($20 for a 25 feet roll at the hydro store) on the panels before doing so. This not only conceals the edges of the mylar, but will secure it too once attached to the frame. I did this by using 3M spray glue ($13 at Home Depot) on the panels and them unrolling the mylar onto the panel keeping it nice and neat.


Almost done, just finish off the top and the panels are done!

While reading some forums on this site, someone gave me the brilliant idea of putting wheels on the box for obvious reasons. I can't remember who it was, but these forums have proven to be an excellent source for pimping out my grow box haha! Anyways, I should have put the wheels on earlier on in the construction but it wasn't a problem. I flipped the caster over and used it as a template for where to drill my holes from the inside.

Last edited by stratlogic; 06-17-2007 at 06:25 AM. Reason: Trying to get the image to show up in the post
[/TD]
[/TR]
[TR]
[TD="class: alt2, bgcolor: #E1F2E2"]
 [/TD]
[/TD]
[TD="class: alt1, bgcolor: #F5FFF7, align: right"] [/TD]
[/TD]
[/TR]
[/TABLE]
[TR]
[TD="class: alt1, bgcolor: #F5FFF7"]
I have recently decided to build a grow box that measures 5'x2'x2' to stick in my closet. Now that I live in the wonderful state of California, it is legal with proper documentation, so why not? My intentions of this post are to inspire people with my ideas just as other peoples posts have done to me. Enjoy!
The first step I took before going out and buying materials, was to determine exactly what I needed to minimize cost by not purchasing any more than I had to. I did this by using a free program downloaded from Google called Google Sketchup. I highly recommend it. I have had much success in designing a mini-bar that I had also constructed. This let me build the box in
3D and to scale using the handy tape measure tool it comes with. The program is very easy to use too. It took me less than a day to get a basic understanding of it. The total for all the wood used for this box was $52 at home depot.
Lumber list.
2 - MDF sheets. 4' x8' x 1/2" $18.99 each
7 - 2" x 2" x 8' pieces $1.55 each
Optional items (well worth it if budget permits)
4 - Caster Wheels $3.79 each
16 - Bolts, Nuts, Washers (1/4") about $5
Thats it. I already had wood screws. I used 2.5" all purpose screws for the frame and 1.25" #10 wood screws to attatch the MDF to the frame. I printed up a template for the cuts needed to be made to the MDF and the dude at Home Depot cut it for me. 6 pieces total, 3 pairs of the same size pieces. Living in an apartment, this would have been difficult. I cut the 2" x 2" pieces myself.
I had originally planned to make the box only 4' tall but wasn't sure if that would be enough room. However, a 4' tall box would only require one piece of MDF almost cutting the price of the box in half.
I would be more than happy to hook anyone up with the file of my plans if you decide to download Google Sketchup since it is needed to view them. Here you can rotate it in 3D and take and view measurements yourself inside and out.
MDF pieces are:
1'11" x 4'11" (x2) front panels
2' x 5' (x2) side panels
2' x 1'11" (x2) top and bottom panels
As far as the 2"x2" cuts go here they are:
2"x2"
-----------------
1'8" (19") x12
5" (60") x4
On with the pics! I like pics when checking out other peoples post so I decided to return the favor. Unfortunately, the only camera I have is on my cell phone so bear with me.
Here is the base assembled. Two of the 2x2's are flush with the edge and the other two have a half inch gap for the fron and back panles to rest on. The sides will be flush with the ground. It will make sense if it doesn't now if you see the Sketchup file.

Part of the frame assembled. Depending on how much room you want to leave for the lights determines how far from the top the second cross piece is attached. I will be leaving roughly a foot of space because I want to put a piece of glass or plexi to isolate the light from the chamber. I will be giving the light its own ventilation independant of the grow chamber.

The frame is almost complete

Next I attached the two frame peices to eachother

After that, the frame is ready to be inserted and attached to the base

The side panels are now ready to be attached. However, I have chosen to put some mylar ($20 for a 25 feet roll at the hydro store) on the panels before doing so. This not only conceals the edges of the mylar, but will secure it too once attached to the frame. I did this by using 3M spray glue ($13 at Home Depot) on the panels and them unrolling the mylar onto the panel keeping it nice and neat.


Almost done, just finish off the top and the panels are done!

While reading some forums on this site, someone gave me the brilliant idea of putting wheels on the box for obvious reasons. I can't remember who it was, but these forums have proven to be an excellent source for pimping out my grow box haha! Anyways, I should have put the wheels on earlier on in the construction but it wasn't a problem. I flipped the caster over and used it as a template for where to drill my holes from the inside.

- Share
-
http://digg.com/submit?phase=2&url=...n.html#post571087&title=Grow+Box+Construction

- http://del.icio.us/post?url=http://...n.html#post571087&title=Grow+Box+Construction

- http://technorati.com/faves/?add=ht...f/65884-grow-box-construction.html#post571087

- http://www.facebook.com/share.php?u...f/65884-grow-box-construction.html#post571087

- http://www.myspace.com/Modules/Post...ction.html#post571087&t=Grow+Box+Construction

- http://twitter.com/home?status=Grow...f/65884-grow-box-construction.html#post571087

-
Last edited by stratlogic; 06-17-2007 at 06:25 AM. Reason: Trying to get the image to show up in the post
[/TD]
[/TR]
[TR]
[TD="class: alt2, bgcolor: #E1F2E2"]
[TD="class: alt1, bgcolor: #F5FFF7, align: right"]
[/TD][/TR]
[/TABLE]
[TABLE="class: tborder vbseo_like_postbit, width: 100%, align: center"]
[TR]
[TD="class: thead, bgcolor: #0A3316"]
 06-17-2007, 05:04 AM[/TD]
[TD="class: thead, bgcolor: #0A3316, align: right"] #2[/TD]
[/TR]
[TR]
[TD="class: alt2, width: 175, bgcolor: #E1F2E2"]stratlogic
420 Member

Join Date: Jun 2007
Location: Los Angeles, CA
Posts: 562

[/TD]
[TD="class: alt1, bgcolor: #F5FFF7"][TABLE="width: 100%"]
[TR]
[TD]Re: Grow Box Construction
[/TD]
[TD]permalink
[/TD]
[/TR]
[/TABLE]
Next I inserted the bolts, washers and nuts and now its mobile!


Before I attach the panels to the frame, I decided to use the extra mylar and cover all exposed wood. I am sure you can get by without it but I chose to go the distance. That and I have a slight case of OCD too. Remember, just two of the four sides need to be completely covered since the panels will cover and secure the edges.

So far this is where I am at. I will keep posting the rest of the progress of this box as it comes along. I am hoping within the next few days to have it done. But please, If anyone has any comments, suggestions, or opinions, I would love to hear them.
[/TD]
[/TR]
[TR]
[TD="class: alt2, bgcolor: #E1F2E2"]
[/TD]
[TD="class: alt1, bgcolor: #F5FFF7, align: right"][/TD]
[/TR]
[/TABLE]
[TR]
[TD="class: thead, bgcolor: #0A3316"]
[TD="class: thead, bgcolor: #0A3316, align: right"] #2[/TD]
[/TR]
[TR]
[TD="class: alt2, width: 175, bgcolor: #E1F2E2"]stratlogic
420 Member
Join Date: Jun 2007
Location: Los Angeles, CA
Posts: 562
[/TD]
[TD="class: alt1, bgcolor: #F5FFF7"][TABLE="width: 100%"]
[TR]
[TD]Re: Grow Box Construction
[/TD]
[TD]permalink
[/TD]
[/TR]
[/TABLE]
Next I inserted the bolts, washers and nuts and now its mobile!


Before I attach the panels to the frame, I decided to use the extra mylar and cover all exposed wood. I am sure you can get by without it but I chose to go the distance. That and I have a slight case of OCD too. Remember, just two of the four sides need to be completely covered since the panels will cover and secure the edges.

So far this is where I am at. I will keep posting the rest of the progress of this box as it comes along. I am hoping within the next few days to have it done. But please, If anyone has any comments, suggestions, or opinions, I would love to hear them.
- Share
- http://digg.com/submit?phase=2&url=...n.html#post571159&title=Grow+Box+Construction
- http://del.icio.us/post?url=http://...n.html#post571159&title=Grow+Box+Construction
- http://technorati.com/faves/?add=ht...f/65884-grow-box-construction.html#post571159
- http://www.facebook.com/share.php?u...f/65884-grow-box-construction.html#post571159
- http://www.myspace.com/Modules/Post...ction.html#post571159&t=Grow+Box+Construction
- http://twitter.com/home?status=Grow...f/65884-grow-box-construction.html#post571159
[/TD]
[/TR]
[TR]
[TD="class: alt2, bgcolor: #E1F2E2"]
[TD="class: alt1, bgcolor: #F5FFF7, align: right"]
[/TD][/TR]
[/TABLE]
[TABLE="class: tborder vbseo_like_postbit, width: 100%, align: center"]
[TR]
[TD="class: thead, bgcolor: #0A3316"]
06-17-2007, 05:05 AM[/TD]
[TD="class: thead, bgcolor: #0A3316, align: right"] #3[/TD]
[/TR]
[TR]
[TD="class: alt2, width: 175, bgcolor: #E1F2E2"]stratlogic
420 Member
Join Date: Jun 2007
Location: Los Angeles, CA
Posts: 562
[/TD]
[TD="class: alt1, bgcolor: #F5FFF7"][TABLE="width: 100%"]
[TR]
[TD]Re: Grow Box Construction
[/TD]
[TD]permalink
[/TD]
[/TR]
[/TABLE]
Thanks Dank. I'm a newb so I appreciate the pointers
[/TR]
[TR]
[TD="class: alt2, bgcolor: #E1F2E2"]
[/TD]
[TD="class: alt1, bgcolor: #F5FFF7, align: right"][/TD]
[/TR]
[/TABLE]
[TR]
[TD="class: thead, bgcolor: #0A3316"]
[TD="class: thead, bgcolor: #0A3316, align: right"] #3[/TD]
[/TR]
[TR]
[TD="class: alt2, width: 175, bgcolor: #E1F2E2"]stratlogic
420 Member
Join Date: Jun 2007
Location: Los Angeles, CA
Posts: 562
[/TD]
[TD="class: alt1, bgcolor: #F5FFF7"][TABLE="width: 100%"]
[TR]
[TD]Re: Grow Box Construction
[/TD]
[TD]permalink
[/TD]
[/TR]
[/TABLE]
Thanks Dank. I'm a newb so I appreciate the pointers
- Share
- http://digg.com/submit?phase=2&url=...n.html#post571161&title=Grow+Box+Construction
- http://del.icio.us/post?url=http://...n.html#post571161&title=Grow+Box+Construction
- http://technorati.com/faves/?add=ht...f/65884-grow-box-construction.html#post571161
- http://www.facebook.com/share.php?u...f/65884-grow-box-construction.html#post571161
- http://www.myspace.com/Modules/Post...ction.html#post571161&t=Grow+Box+Construction
- http://twitter.com/home?status=Grow...f/65884-grow-box-construction.html#post571161
[/TR]
[TR]
[TD="class: alt2, bgcolor: #E1F2E2"]
[TD="class: alt1, bgcolor: #F5FFF7, align: right"]
[/TD][/TR]
[/TABLE]
[TABLE="class: tborder vbseo_like_postbit, width: 100%, align: center"]
[TR]
[TD="class: thead, bgcolor: #0A3316"]
06-17-2007, 05:22 AM[/TD]
[TD="class: thead, bgcolor: #0A3316, align: right"] #4[/TD]
[/TR]
[TR]
[TD="class: alt2, width: 175, bgcolor: #E1F2E2"]Dunlap
420 Member

Join Date: Nov 2005
Location: Texas
Posts: 464
[/TD]
[TD="class: alt1, bgcolor: #F5FFF7"][TABLE="width: 100%"]
[TR]
[TD]Re: Grow Box Construction
[/TD]
[TD]permalink
[/TD]
[/TR]
[/TABLE]
That's awesome man, having the pictures there when talking about building it really helps. I've been thinking about building a box but I'm not so good on building stuff from nothing, so this is perfect
 I'd be interested to hear how many plants your planning to put in there as well.
Thanks dude, can't wait to see the finished product

420 Magazine
Creating Cannabis Awareness Since 1993

Forum Guidelines
How to Post Photos
How to Pass a Drug Test
[/TD]
[/TR]
[TR]
[TD="class: alt2, bgcolor: #E1F2E2"]
[/TD]
[TD="class: alt1, bgcolor: #F5FFF7, align: right"][/TD]
[/TR]
[/TABLE]
[TR]
[TD="class: thead, bgcolor: #0A3316"]
[TD="class: thead, bgcolor: #0A3316, align: right"] #4[/TD]
[/TR]
[TR]
[TD="class: alt2, width: 175, bgcolor: #E1F2E2"]Dunlap
420 Member
Join Date: Nov 2005
Location: Texas
Posts: 464
[/TD]
[TD="class: alt1, bgcolor: #F5FFF7"][TABLE="width: 100%"]
[TR]
[TD]Re: Grow Box Construction
[/TD]
[TD]permalink
[/TD]
[/TR]
[/TABLE]
That's awesome man, having the pictures there when talking about building it really helps. I've been thinking about building a box but I'm not so good on building stuff from nothing, so this is perfect
Thanks dude, can't wait to see the finished product
- Share
- http://digg.com/submit?phase=2&url=...n.html#post571169&title=Grow+Box+Construction
- http://del.icio.us/post?url=http://...n.html#post571169&title=Grow+Box+Construction
- http://technorati.com/faves/?add=ht...f/65884-grow-box-construction.html#post571169
- http://www.facebook.com/share.php?u...f/65884-grow-box-construction.html#post571169
- http://www.myspace.com/Modules/Post...ction.html#post571169&t=Grow+Box+Construction
- http://twitter.com/home?status=Grow...f/65884-grow-box-construction.html#post571169
420 Magazine
Creating Cannabis Awareness Since 1993
Forum Guidelines
How to Post Photos
How to Pass a Drug Test
[/TD]
[/TR]
[TR]
[TD="class: alt2, bgcolor: #E1F2E2"]
[TD="class: alt1, bgcolor: #F5FFF7, align: right"]
[/TD][/TR]
[/TABLE]
[TABLE="class: tborder vbseo_like_postbit, width: 100%, align: center"]
[TR]
[TD="class: thead, bgcolor: #0A3316"]
06-17-2007, 06:03 AM[/TD]
[TD="class: thead, bgcolor: #0A3316, align: right"] #5[/TD]
[/TR]
[TR]
[TD="class: alt2, width: 175, bgcolor: #E1F2E2"]stratlogic
420 Member
Join Date: Jun 2007
Location: Los Angeles, CA
Posts: 562
[/TD]
[TD="class: alt1, bgcolor: #F5FFF7"][TABLE="width: 100%"]
[TR]
[TD]Re: Grow Box Construction
[/TD]
[TD]permalink
[/TD]
[/TR]
[/TABLE]
I am planning to go hydro. I tried it once with much success with this crazy setup I created with a 5 gal bucket, a CD spool lid, and an air and water pump when I lived in AZ. But when the summer rolled around, I couldn't control the heat. I plan on posting that setup once the box is done. I have one 400 mh light and a 400 hps. I originally intended on one plant but after I built it, I realized I can fit two 5 gal buckets in there. with no prob. Probably no more than two because I don't want to crowd and the two plants should be enough for me and my buds if I always have one in the oven. I intend on building one more box for vegging. I was also considering adding another chamber to the bottom for cloning since I have the vertical room but just an idea. Any suggestions of what you would do? I would like to hear since this will be my second grow.
Last edited by stratlogic; 06-17-2007 at 06:05 AM. Reason: Correcting punctuation. I'm weird like that.
[/TD]
[/TR]
[TR]
[TD="class: alt2, bgcolor: #E1F2E2"]
[/TD]
[TD="class: alt1, bgcolor: #F5FFF7, align: right"][/TD]
[/TR]
[/TABLE]
[TR]
[TD="class: thead, bgcolor: #0A3316"]
[TD="class: thead, bgcolor: #0A3316, align: right"] #5[/TD]
[/TR]
[TR]
[TD="class: alt2, width: 175, bgcolor: #E1F2E2"]stratlogic
420 Member
Join Date: Jun 2007
Location: Los Angeles, CA
Posts: 562
[/TD]
[TD="class: alt1, bgcolor: #F5FFF7"][TABLE="width: 100%"]
[TR]
[TD]Re: Grow Box Construction
[/TD]
[TD]permalink
[/TD]
[/TR]
[/TABLE]
I am planning to go hydro. I tried it once with much success with this crazy setup I created with a 5 gal bucket, a CD spool lid, and an air and water pump when I lived in AZ. But when the summer rolled around, I couldn't control the heat. I plan on posting that setup once the box is done. I have one 400 mh light and a 400 hps. I originally intended on one plant but after I built it, I realized I can fit two 5 gal buckets in there. with no prob. Probably no more than two because I don't want to crowd and the two plants should be enough for me and my buds if I always have one in the oven. I intend on building one more box for vegging. I was also considering adding another chamber to the bottom for cloning since I have the vertical room but just an idea. Any suggestions of what you would do? I would like to hear since this will be my second grow.
- Share
- http://digg.com/submit?phase=2&url=...n.html#post571192&title=Grow+Box+Construction
- http://del.icio.us/post?url=http://...n.html#post571192&title=Grow+Box+Construction
- http://technorati.com/faves/?add=ht...f/65884-grow-box-construction.html#post571192
- http://www.facebook.com/share.php?u...f/65884-grow-box-construction.html#post571192
- http://www.myspace.com/Modules/Post...ction.html#post571192&t=Grow+Box+Construction
- http://twitter.com/home?status=Grow...f/65884-grow-box-construction.html#post571192
Last edited by stratlogic; 06-17-2007 at 06:05 AM. Reason: Correcting punctuation. I'm weird like that.
[/TD]
[/TR]
[TR]
[TD="class: alt2, bgcolor: #E1F2E2"]
[TD="class: alt1, bgcolor: #F5FFF7, align: right"]
[/TD][/TR]
[/TABLE]
[TABLE="class: tborder, width: 100%, align: center"][TR]
[TD="class: thead, bgcolor: #0A3316"]Sponsored Links[/TD]
[/TR]
[TR]
[TD="class: alt1, bgcolor: #F5FFF7, align: center"][/TD]
[/TR]
[/TABLE]
[TABLE="class: tborder vbseo_like_postbit, width: 100%, align: center"]
[TR]
[TD="class: thead, bgcolor: #0A3316"]
06-18-2007, 12:45 AM[/TD]
[TD="class: thead, bgcolor: #0A3316, align: right"] #6[/TD]
[/TR]
[TR]
[TD="class: alt2, width: 175, bgcolor: #E1F2E2"]fallen
420 Member

Join Date: May 2006
Posts: 391
[/TD]
[TD="class: alt1, bgcolor: #F5FFF7"][TABLE="width: 100%"]
[TR]
[TD]Re: Grow Box Construction
[/TD]
[TD]permalink
[/TD]
[/TR]
[/TABLE]
sticky this when it's done!
(just a thought)
[/TR]
[TR]
[TD="class: alt2, bgcolor: #E1F2E2"]
[/TD]
[TD="class: alt1, bgcolor: #F5FFF7, align: right"][/TD]
[/TR]
[/TABLE]
[TR]
[TD="class: thead, bgcolor: #0A3316"]
[TD="class: thead, bgcolor: #0A3316, align: right"] #6[/TD]
[/TR]
[TR]
[TD="class: alt2, width: 175, bgcolor: #E1F2E2"]fallen
420 Member
Join Date: May 2006
Posts: 391
[/TD]
[TD="class: alt1, bgcolor: #F5FFF7"][TABLE="width: 100%"]
[TR]
[TD]Re: Grow Box Construction
[/TD]
[TD]permalink
[/TD]
[/TR]
[/TABLE]
sticky this when it's done!
(just a thought)
- Share
- http://digg.com/submit?phase=2&url=...n.html#post571399&title=Grow+Box+Construction
- http://del.icio.us/post?url=http://...n.html#post571399&title=Grow+Box+Construction
- http://technorati.com/faves/?add=ht...f/65884-grow-box-construction.html#post571399
- http://www.facebook.com/share.php?u...f/65884-grow-box-construction.html#post571399
- http://www.myspace.com/Modules/Post...ction.html#post571399&t=Grow+Box+Construction
- http://twitter.com/home?status=Grow...f/65884-grow-box-construction.html#post571399
[/TR]
[TR]
[TD="class: alt2, bgcolor: #E1F2E2"]
[TD="class: alt1, bgcolor: #F5FFF7, align: right"]
[/TD][/TR]
[/TABLE]
[TABLE="class: tborder vbseo_like_postbit, width: 100%, align: center"]
[TR]
[TD="class: thead, bgcolor: #0A3316"]
06-19-2007, 12:11 AM[/TD]
[TD="class: thead, bgcolor: #0A3316, align: right"] #7[/TD]
[/TR]
[TR]
[TD="class: alt2, width: 175, bgcolor: #E1F2E2"]stratlogic
420 Member
Join Date: Jun 2007
Location: Los Angeles, CA
Posts: 562
[/TD]
[TD="class: alt1, bgcolor: #F5FFF7"][TABLE="width: 100%"]
[TR]
[TD]Re: Grow Box Construction
[/TD]
[TD]permalink
[/TD]
[/TR]
[/TABLE]
With the top section, I used foil on the frame instead of mylar because of its ability to protect against the heat of the 400 watt lights I am going to use.

The back panel has been attached.

The sides and back have all been attached. I still haven't decided how I am going to do the door. I thought of using hinges but it might be easier and accessible to use latches instead. That way I can remove the door and get it out of the way if I need to. It's all about options.

Heres a view of the top from the inside.

All closed Up


All that is left is ventilation, mounting the light fixtures and getting the glass to separate the light from the grow chamber. This hardware store down the street sells custom cut pieces of glass.

[/TD]
[/TR]
[/TABLE]
[TR]
[TD="class: thead, bgcolor: #0A3316"]
[TD="class: thead, bgcolor: #0A3316, align: right"] #7[/TD]
[/TR]
[TR]
[TD="class: alt2, width: 175, bgcolor: #E1F2E2"]stratlogic
420 Member
Join Date: Jun 2007
Location: Los Angeles, CA
Posts: 562
[/TD]
[TD="class: alt1, bgcolor: #F5FFF7"][TABLE="width: 100%"]
[TR]
[TD]Re: Grow Box Construction
[/TD]
[TD]permalink
[/TD]
[/TR]
[/TABLE]
With the top section, I used foil on the frame instead of mylar because of its ability to protect against the heat of the 400 watt lights I am going to use.

The back panel has been attached.

The sides and back have all been attached. I still haven't decided how I am going to do the door. I thought of using hinges but it might be easier and accessible to use latches instead. That way I can remove the door and get it out of the way if I need to. It's all about options.

Heres a view of the top from the inside.

All closed Up


All that is left is ventilation, mounting the light fixtures and getting the glass to separate the light from the grow chamber. This hardware store down the street sells custom cut pieces of glass.

[/TD]
[/TR]
[/TABLE]