building first grow cabinet

niggle

Member
ok so I've been looking for a suitable cabinet to grow in, i recently found a cabinet that was tall enough and i could work with.

right now I'll be using :
1 - milk crate with soil
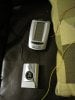
1 - 6" inline fan
1 - 4" inline fan
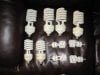
4 - 42 watt cfl bulbs
4 - 20 watt cfl bulbs
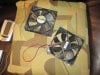
2 - 120 mm pcu fan
X sq.ft. panda paper
X sq.ft. e-dead sound deadening

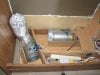
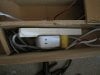
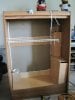
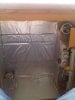
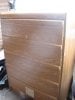
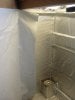
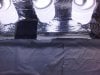
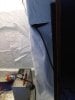
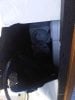
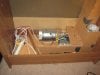
attached are pictures of what i got done today, i forgot to get a picture of the cabinet before i tore into it so there is no baseline....

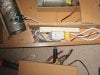
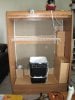
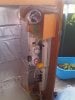
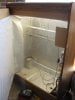
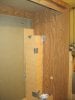
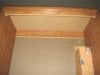
i have so far built the false floor where the fans are located, there is also spaces for tools and the electrical which i will build hinged doors onto. the two fans are intended on removing air from the grow container, one will be filtered one will not and i will be adding a ona smell block thing into the air duct outlet. till then the floor is not permanently closed in. there will be two passive air intakes vertically on the left hand side of the back to help with air flow and provide fresh air for the fans

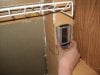
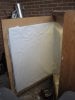
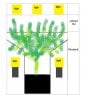
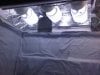
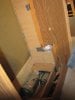
i have also marked out a rough idea where two 120mm CPU fans will be cut into the back, one blowing cold air in, the other sucking out the hot air, they will be mounted on the top back of the unit above a Plexiglas glass window helping keep heat off the plants.

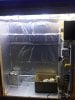
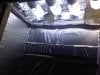
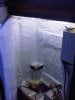
before i add the sound deadening i will add cuaking to every seam i can. the sound deadening is both for sound and insulation , i have a roll left over from working on my car and can spare it or else i wouldn't be using it lol.... i will be putting panda paper over the e-dead as a final layer inside.

IMG_1958.jpgIMG_1960.jpgIMG_1961.jpgIMG_1963.jpgIMG_1959.jpgIMG_1967.jpgIMG_1964.jpgIMG_1966.jpg
 

Serapis

Well-Known Member
I like what you have done! I do not agree with your fans however. You have both the intake and exhaust at the same level, yet cooler intake air comes from near the floor. I also do not understand your duct work. If going with two Pc fans, just have both at that top level blowing out. Provide passive intakes at the lower level and you have a negative pressure grow. The ONA gel should be sufficient for that size grow, or you can try a 440 plug in negative ion generator sold on eBay. Just make sure to remove it two weeks prior to harvest, or relocate it from grow area to an outlet in the same room.

just looked again and saw inline duct fans.... those are going to make some noise, mounted in that fashion. Consider mounting at top as dual exhaust or, use 4" as intake fan and 6" as exhaust with smell filter.
 

niggle

Member
ok so quick update, i forgot to take pics and i had to put the cabinet away cause in-laws are coming over.

daffy: I'm not sure what scrog, vscrog, sog, means but it wont be a perpetual grow, i don't mind the downtime, and i have feminized white widow seeds that i have used for both indoors and outdoors and will keep using the same seeds. for soil i make my own compost and have a free bag of black top soil i have laying around.

i have moved the 4" inline fan to the left side, and is now blowing air in from spot away from the exhaust fan, i was able to use the right corner as a utility hatch for the electrical, above the hatch is a ledge for a 2L with sugar and yeast...

i ran the wires for the lights and fans on the top inside the air shaft for the 6", i will be powering the 6 120mm fans with one large 12v, 1amp transformer, an they will all be wired in with the light timer.

i am currently looking at filters online and i think i will go with this one...
http://www.hydroasis.com/hy/productdetail.aspx?id=1229
 

niggle

Member
so the inlaws left and i got some time to do a little more work, not as much as i would like but enough. i cuaked around all the main seams except for the floor till i cut the holes for the ventilation. tomorrow i will hopefully pick up a bathroom wall fixture for 4 lights, to save me some time fabricating one. i have decided to make my own filter and will start planning for that, i think something the size of a shoe box where the lid is the filter should be enough surface area.

i will be cropping and lsting the plant as well i have a metal shoe rack that will work as a screen to control the height of the plants, since it is a tall cab i will be running 4 24watt cfls about a 1ft below the bar to help the lower branch's fill out.

i was told that soil might be a heavy grow medium for such a container so i am looking at roots coco mix, and then adding some seabird & bat guano, bone & blood meal, and alot of perlite. i think that would be a good start to a organic feeding.

the only part of coco i don't like is the idea of watering them multiple times a day,but some say you don't have to so im unsure to that.

next its finishing the exhaust and lights, i have to borrow a jigsaw to do the work.i have to cut 5 holes, 2 intake, 2 exhaust, one passive, then i can sound deaden the motors and then close up the floor, sadly the sound deadening is 1hr away at my parents were i store my car
 

Attachments

niggle

Member
so here is a quick update, its been a while cuase im low on funds lol, so i am waiting for my last 120mm fan, and then i can close up the top and the lights are done, i have installed the bathroom deco unit and now have 4 light outlets, also i put the quarter round so i can slide the plexi class in and out.

i have finished the floor and air ducks, i used spray foam to help seal the motors and they are super quite now. i have also cut the vents for the intake and exhaust.


also i will have figured out how im going to wire it all up

recepticle--- |--- power bar ----(constant power accessories )
..................|
..................|--- power bar|---- timer 1 ----- power bar ( lighting )
.............................. ........|
.............................. ........|---- timer 2 ----- power bar ( ventilation )


niggle

Member
another update, so now the sound deadening is on, the electrical is almost done, just have to wire in the 120mm fans. I will be cutting the plexi glass tomorrow for the barrier between the lights and plants...

also I will be going to the pet store and get some filter fill. once i finish all the 120mm fans and the air filter i will put panda paper over the sound deadening. the last step will be the grill to control the height of the plant and the lights that will help growth at early stages and underneath once taller. i will be using some old 1/2 pvc and some old lamp sockets to make the frame to hold 4 lights along the three inner walls.

the door will be my last big push ....
 

Attachments

niggle

Member
its been a while since i posted progress, so here are some new pictures, i attached the door with a raised panel that has panda paper on it. the raise panel comes out about a 1/2" and fits the grow space.the panel has a flap of panda paper that will cover the hinges , it will be glued down first and then the interior layer will cover the glued down flap.

I still have to find the right kind of lock, then I will add the mounts to help hold the door in place on the lock side.


there are light leaks but i have both padded weather stripping and rubber door weather stripping. the padding will go on the top and bottom of the door where there are proper backings to create a seal. the rubber door stripping will be on the right side of the door.


IMG_2735.jpgIMG_2730.jpgIMG_2732.jpgIMG_2733.jpg
 

niggle

Member
so another update:

i wired up two fans to my transformer but found out the transformer is not working ... but they are wired in so i just have to change out the transformer... I didnt finish the carbon filter but i mounted the inside guts, i have a few more things to finish the filter but thats a secondary project....

i glued the panda paper in except for the floor which i will waterproof then paint white. i have the plexi glass ready to go in and once its in and the wires are put away the cab can get its door again and it will be done :O.....


niggle

Member
thanks looks like your the only one who cares about this on here lol..... im almost ready to finish it all off.
 
Really nice job on the cabby. You may be disappointed in the axial fans, I replaced my ventilation system with blowers after buring out several axial fans - even good ones. Keep an eye on them because many tend to lose RPMs and run at either a lower or lower and variable rate. If there is an imbalance in pressure in the cabby (either direction) the fans will really struggle and leave you replacing with a blower. Looks great though, good luck with your outstanding effort. Now you need good genetics...
 

Jloi

Well-Known Member
I was going to start 2 grow cabs kinda like yours. Keep up the good work, it's coming along and looking good! Did you get the plexiglass cut yet for the lights? Also if you have a peace of plexglass in front of the light is this going to cut down on the light rays that hit the plants preventing better growth?
 

niggle

Member
so the cab is finished, I will install a lock later and still need to cover some of the light leaks but its done. tomorrow its coming into the apartment and it will be sitting for a while. since money is tight, ill just be using soil and a smart pot like bag.

once i figure out the pot size and location i will put the scrog materials in, i will have a mesh on the sides were the lower lights will be and the screen horizontally to make the sog.

here's a pic of the scrog setup i will build...

grow setup.jpg


here are some pictures of the cab finished, ill admit there are a few things i have to touch up but its basically done...

its been on for the last 3hrs and its running smooth.....

IMG00498-20100921-1700.jpgIMG00502-20100921-1701.jpgIMG00500-20100921-1700.jpgIMG00499-20100921-1700.jpgIMG00503-20100921-1701.jpgIMG00504-20100921-1701.jpg
 

niggle

Member
I was going to start 2 grow cabs kinda like yours. Keep up the good work, it's coming along and looking good! Did you get the plexiglass cut yet for the lights? Also if you have a peace of plexglass in front of the light is this going to cut down on the light rays that hit the plants preventing better growth?
i uploaded pictures with the plexiglass in. unless i show you the edge of it, you cant tell its there... so i bet cuases zero light loss...
 

niggle

Member
heres a vid took it with my bb so sorry for the shitty quality, and im not a camera man lmao. in the vid i tried to show the black out vents for the lights

the power box is running my computer fans while i test them out, then i will wire in the true transformer. note how quiet the cab is. during th video there is a 4" & 6" inline fan, and 2 120mm computer fans. you hear more noise from my fingers. as for heat, i wouldn't take a guess till i get my thermometer batteries replaced. but the plexiglass is helping separate the air as the hot air flows out from that cool reflector setup.

 
Top