Sonnshine
Member
I'd read up on diy LED systems, but never really got it until I read Gaius' Battlestar Ganjatica thread. Then it clicked and I had the courage to try it myself. I studied up here and lapped up advice from CaptainMorgan, SupraSL, TimFox and many others. if I don't name you, it's because, well, you know, stoners and recall. When I had questions about my fan issues, several people helped out and identified a bad power supply. I just want to thank everyone who contributes their knowledge and expertise to this group. Maybe I'm just giddy because IT WORKS!, but really, you guys are fucking awesome.
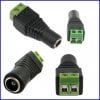
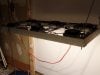
It's primitive - more a proof of concept. No dimmers, hell, no one/off switch. I went with inexpensive Z2 cxa3070s (6 total) 4000K, Ideal holders (no lens, no reflectors) and Arctic 11 PLUS CPU coolers. The toughest part was hooking up the 30g fan wires to the 14g 50V wire, had to bone up on a trick from RC enthusiasts, tine the fan wire, wrap the larger wire around it and solder. The rest was all pretty simple.
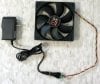
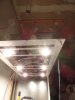
I made a few mistakes - started with everything mounted to pine board, discovered drivers can potentially get warm, so made an aluminium frame. Burned out a few fans with the new power supply, but all in all, it was fun to make, and without the mistakes, was about $450 plus misc parts, should run around 350W. Now I want to make something with cxb cobs!
It's primitive - more a proof of concept. No dimmers, hell, no one/off switch. I went with inexpensive Z2 cxa3070s (6 total) 4000K, Ideal holders (no lens, no reflectors) and Arctic 11 PLUS CPU coolers. The toughest part was hooking up the 30g fan wires to the 14g 50V wire, had to bone up on a trick from RC enthusiasts, tine the fan wire, wrap the larger wire around it and solder. The rest was all pretty simple.
I made a few mistakes - started with everything mounted to pine board, discovered drivers can potentially get warm, so made an aluminium frame. Burned out a few fans with the new power supply, but all in all, it was fun to make, and without the mistakes, was about $450 plus misc parts, should run around 350W. Now I want to make something with cxb cobs!
Attachments
-
 220.4 KB Views: 73
 -
 226.6 KB Views: 74