SirGreenThumbs 12/12 From Seed Grow Journal

SirGreenThumb

Well-Known Member
Thanks.

I threw that thing together in 20 mins with bong hits in between. It helped that all the parts I got fit together perfectly also.
 

SirGreenThumb

Well-Known Member
For anyone interested in building that make sure that you bend the aluminum that attaches to the board in an L shape.

Also, un-rolling he aluminum is a pain in the ass and will cut you if you're not careful.
 

SirGreenThumb

Well-Known Member
This is the gist of it.. :grin: Hope this write up is ok.. Kinda hard to explain without pics.

SUPPLIES:
http://www.homedepot.com/p/Master-Flow-4-in-x-2-ft-Round-Metal-Duct-Pipe-BCP4X24/100123979 ROUND METAL DUCT PIPE X 2
SELF TAPPING SCREWS
http://www.homedepot.com/p/Unbranded-1-4-x-4-x-2-Red-Oak-S4S-Board-754735/100039178?N=5yc1vZbqmcZ1z0tm9p#specifications 1/4 x 4 x 2 Red Oak S4S Board
http://www.homedepot.com/p/Hampton-Bay-4-Light-Chrome-Raceway-Bath-Light-EW554CH/202228672 vanity light fixture
5/32 & 5/16 drill bit/power drill
Coat hanger


Start by unrolling the metal pipe. Ideally you want a metal bending table but you can make any table edge work. The idea is to bend a 2” lip down the whole side. This lip is where you will attach it to the back of the board, it will also be where need to use the 5/32 drill bit. Once all bends are made, set the metal to the side. Drill 3 or more holes all the way down the bends on both pieces.

Take the vanity fixture out of the box, remove the cylinder pieces around the sockets. Once they are removed you will be able to pull the fixture apart. More than likely there will be a separate ground holding the 2 pieces together, you wont need this. Cut it off. Inside there are 2 wires-white and black, these wires will be used to wire a plug to the fixture. Center the bottom half of the fixture on the board and mark where you will drill the hole for the wires. Use the 5/16 drill bit and drill a hole there. After the whole is drilled, feed the wires through the hole lay the board down and attach the fixture to the board.

Center the wings on the back of the board and screw them down.. You will see that the wings make a m shape. You will want to drill a hole on the inside of the m on each side. This is where you will attach the coat hanger.

Take the coat hanger where it bends into a triangle and cut both sides. Shape the tips of the hanger to fit inside the holes that you just drilled on the wings.

Wire a plug and cap them off.
Thank you very much...
 

SirGreenThumb

Well-Known Member
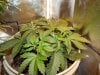
In the process of attempting to get some freebase propylhexedrine from some benzedrex inhalers. I am in the evaporation stage from the extraction of two infused cotton pieces.

100ml of distilled vinegar was used 5% acid. This was the first solution. The next was used with 50ml DV5% and filtered into another jar. First solution was shaken periodically for 45 min while the 2nd was shaken for 25 min.
DSCN2388.jpg

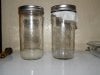
First solution filtered with 2nd waiting. (would this process be called fermenting? Not sure) :lol:
DSCN2391.jpg

Called for using Naptha, but I used lighter fluid. :wink:
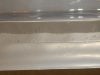
Look at all that nasty shit floating. I had actually taken this ziplock bag and put the mixture in a corner. This was the easiest way to separate the 2 liquids, by pinching then cutting the corner, it allowed me to separate the 2 without the lighter fluid getting back into the DV5% solution to be evaporated.
DSCN2401.jpg

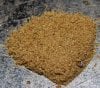
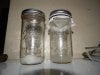
Here is the finished separated DV5%-Propylhexedrine mix being evaporated.

DSCN2404.jpg

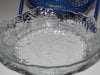
This has taken all the lavender oil and menthol out of the product. The only smell coming from it now is a vinegar scent. Smells like salt and vinegar chips. :wink:

Hopefully this works. I can see crystals forming in the bottom. I think that's a good sign, this is my first time.
 

MrEDuck

Well-Known Member
Dude get a real sep funnel if you're planning on doing stuff like this. The plastic bag is not ok to mix with solvents.
 

SirGreenThumb

Well-Known Member
I didn't mix it in the bag. I shook it for 5 min in a jar and poured it right in the bag. :wink: Not sure if that makes a difference and I know I need a sep funnel as it would have made this process a little easier.

Does it look like I did everything right? :lol:
 

SirGreenThumb

Well-Known Member
So the AA has been alive for like 5 weeks and I would guess about another 4-5 weeks to finish flowering. She has a total of 12 tops and they all look like:
DSCN2443.jpg

The male branch looks like:
DSCN2418.jpg

and the blue dream that I'm not sure if its turning male:
DSCN2430.jpg

I'm pretty happy with the AA and I think I'll pull about 7oz from it. :grin:
 

MrEDuck

Well-Known Member
The AA looks nice inspite of the burn! I think I might have to try to run some of those outside next year. Or maybe run one while I do a long veg in the tent just to keep some production. So many possibilities so little space...
 

SirGreenThumb

Well-Known Member
Yea, the burn is only on the old leaves. the new growth has improved quite a bit. She smells real nice. Got that piney smell, its very strong.

Also, do you happen to know why my extraction is yielding a goop instead of a powder?
 
Top