FatMarty
Well-Known Member
I see a lot of people wondering how to cool their HID hoods.
At the same time lots of folks don't like the loud canfans that are available to growers.
Without some air running through the hood and away from the grow heat often becomes an issue.
I used a 5-gallon bucket, a couple bucket lids, a 6" vent collar, a flowerpot, some pipe insulation, and a fair amount of silicone and vent adhesives,
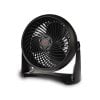
along with a 9" 3-speed Honeywell "Turbo Fan", to construct my homemade can fan.
http://www.lowes.com/pd_333638-79996-HT-900-LWS_4294857062+4294962546_40_?productId=3344698
I have successfully used this design to cool my 1000 W HID hood for several years with no problems and almost nil fan noise.
I used a couple other fans of the desktop/oscillating variety for consumers until I hit on this Honeywell model to pull and push the air through 6" vent without hum or motor noise.
I can't remember if it's set on low or medium; been a year or more since I went in there to clean it.
In temperate weather low speed is fine for my hood and exhaust setup; I may have turned it up last time because I added CFL's and the room was running hotter than before.
I can touch the bottom of the glass no problem on my hood with either setting.
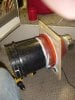
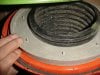
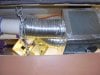
Here is the completed canfan sans the plywood mount I used for my installation:
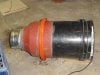
First I took a 5-gallon bucket and cut the bottom out.
Then using a 10" flowerpot that tapers near the bottom I cut a 6" hole in the bottom of it.
Next cut a 10" hole in a bucket lid, and then slip it over the flowerpot and seal to bucket.
Fasten 6" Vent collar to bottom of flowerpot as shown, and seal.
Slice foam pipe insulation and wrap around rim of Honeywell ffan, (sans plastic stand).
Insert Honeywell fan into bucket and seal foam to bucket.
Run three or four short sheet metal screws around bucket/flowerpot combe into plastic shell of fan to secure it.
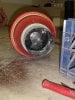
Note that the airflow is towards 6" vent collar.
Let the vent sealant set up overnight or longer.
Test fan to make sure you didn't onstruct or warp, etc. anything.
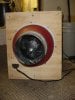
I mount my canfan on a wall to my grow room utilizing a piece of plywood, screws, and silicone.
I might have done this all at once because the silicone needs to dry too for best end result.
Next I screwed my piece of plywood holding the canfan to the studs at my opening in the wall.
Before hooking up the 6" vent to my hood I connected the input to the rear side of the canfan installation.
I have a 'secret' air tunnel behind my veg room for plumbing, etc. There is just enough room back here for me and the spiders.
Next I use the second bucket lid along with the bottom of a bucket to make a stiff interlock for some 6" drainage pipe I used for my input.
You've seen this hose in giant rolls along the highway for road projects, etc.
Anyway I cut some tight circles in the plastics and jammed that puppy in there nice and tight.
You could use another 6" vent collar here if you are using regular vent or flex.
Next snap the bucket lid assembly to the back of the canfan, and secure the vent line if necessary.
I have a crawlspace under my family room that has airflow but no entry.
I removed a portion of one concrete block and then used "Great Stuf" to seal the pipe to the wall.
That Great Stuf dries stiff and strong - wipe excess as it oozes out the first 15 minutes or so if you don't want a total mess here.
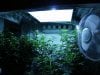
Used In this garden:
I'll post a couple pics showing how I vent the exhaust soon to finish this up.
Okay I'm back to finish up my installation for you.
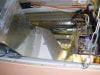
My hood came with a removable 4" cover in the center on far side from bulb and a removable 4" cover on one side behind the lamp.
I cut out another hole on the back side to get airflow all around the bulb on the intake.
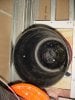
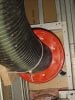
In the photo above you can see the bottom of the 6" vent pipe coming from the CanFan to the back of the fixture.
That is a tapered connection to spread the input feed more evenly.
On the far side with the one center hole I cut out something like 7" x 7" and attached a sheetmetal box to the fixture.
On the side of the sheetmetal box are two 4" collars for outlet air to flow.
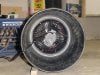
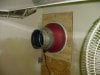
In this image you see the sheetmetal box portruding from the fixture in the foreground
and the 6" input pipe coming from the homemade CanFan in lower right corner to the rear of the unit.
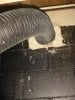
On this side of the sheetmetal box are two 4" collars with 4" flex running several inches before reducing into
3" DWV PVC pipes for the exhaust.
The two 3" PVC pipes are routed out of bloom room and up interior wall of home to roof.
At roof pipes have small plastic screens to keep critters out.
They appear next to other plumbing vent pipes on the roof and look like they belong there.
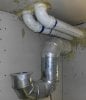
The 6" stuff below the PVC is my current fresh air exhaust.
The 180* bend there is to prevent light leak.
At the same time lots of folks don't like the loud canfans that are available to growers.
Without some air running through the hood and away from the grow heat often becomes an issue.
I used a 5-gallon bucket, a couple bucket lids, a 6" vent collar, a flowerpot, some pipe insulation, and a fair amount of silicone and vent adhesives,
along with a 9" 3-speed Honeywell "Turbo Fan", to construct my homemade can fan.
http://www.lowes.com/pd_333638-79996-HT-900-LWS_4294857062+4294962546_40_?productId=3344698
I have successfully used this design to cool my 1000 W HID hood for several years with no problems and almost nil fan noise.
I used a couple other fans of the desktop/oscillating variety for consumers until I hit on this Honeywell model to pull and push the air through 6" vent without hum or motor noise.
I can't remember if it's set on low or medium; been a year or more since I went in there to clean it.
In temperate weather low speed is fine for my hood and exhaust setup; I may have turned it up last time because I added CFL's and the room was running hotter than before.
I can touch the bottom of the glass no problem on my hood with either setting.
Here is the completed canfan sans the plywood mount I used for my installation:
First I took a 5-gallon bucket and cut the bottom out.
Then using a 10" flowerpot that tapers near the bottom I cut a 6" hole in the bottom of it.
Next cut a 10" hole in a bucket lid, and then slip it over the flowerpot and seal to bucket.
Fasten 6" Vent collar to bottom of flowerpot as shown, and seal.
Slice foam pipe insulation and wrap around rim of Honeywell ffan, (sans plastic stand).
Insert Honeywell fan into bucket and seal foam to bucket.
Run three or four short sheet metal screws around bucket/flowerpot combe into plastic shell of fan to secure it.
Note that the airflow is towards 6" vent collar.
Let the vent sealant set up overnight or longer.
Test fan to make sure you didn't onstruct or warp, etc. anything.
I mount my canfan on a wall to my grow room utilizing a piece of plywood, screws, and silicone.
I might have done this all at once because the silicone needs to dry too for best end result.
Next I screwed my piece of plywood holding the canfan to the studs at my opening in the wall.
Before hooking up the 6" vent to my hood I connected the input to the rear side of the canfan installation.
I have a 'secret' air tunnel behind my veg room for plumbing, etc. There is just enough room back here for me and the spiders.
Next I use the second bucket lid along with the bottom of a bucket to make a stiff interlock for some 6" drainage pipe I used for my input.
You've seen this hose in giant rolls along the highway for road projects, etc.
Anyway I cut some tight circles in the plastics and jammed that puppy in there nice and tight.
You could use another 6" vent collar here if you are using regular vent or flex.
Next snap the bucket lid assembly to the back of the canfan, and secure the vent line if necessary.
I have a crawlspace under my family room that has airflow but no entry.
I removed a portion of one concrete block and then used "Great Stuf" to seal the pipe to the wall.
That Great Stuf dries stiff and strong - wipe excess as it oozes out the first 15 minutes or so if you don't want a total mess here.
Used In this garden:
I'll post a couple pics showing how I vent the exhaust soon to finish this up.
Okay I'm back to finish up my installation for you.
My hood came with a removable 4" cover in the center on far side from bulb and a removable 4" cover on one side behind the lamp.
I cut out another hole on the back side to get airflow all around the bulb on the intake.
In the photo above you can see the bottom of the 6" vent pipe coming from the CanFan to the back of the fixture.
That is a tapered connection to spread the input feed more evenly.
On the far side with the one center hole I cut out something like 7" x 7" and attached a sheetmetal box to the fixture.
On the side of the sheetmetal box are two 4" collars for outlet air to flow.
In this image you see the sheetmetal box portruding from the fixture in the foreground
and the 6" input pipe coming from the homemade CanFan in lower right corner to the rear of the unit.
On this side of the sheetmetal box are two 4" collars with 4" flex running several inches before reducing into
3" DWV PVC pipes for the exhaust.
The two 3" PVC pipes are routed out of bloom room and up interior wall of home to roof.
At roof pipes have small plastic screens to keep critters out.
They appear next to other plumbing vent pipes on the roof and look like they belong there.
The 6" stuff below the PVC is my current fresh air exhaust.
The 180* bend there is to prevent light leak.