DANKSWAG
Well-Known Member
First I'd like thank what Ed Rosenthal has shared on passive hydroponics and what sub cool has contributed with his super soil recipe.
I think I've basically set the course for the lazy man's grow... or getting closer it seems for me at least.
My intention was to get the best of both worlds to get the plant to do all the work in watering and feeding itself.
I know it sounds a little lazy on my part, but hey I've always choose to work smart, not hard.
The passive hydroponic relies on a wicking system, keep in mind wicking is only as good and the medium for the wick and exposure it has to the reservoir. I use your standard cloth pot(s) now it serves multiple purposes. One air pruning of the roots which is very beneficial the second is the entirety of the bottom surface becomes the wick material for the roots to engage in capillarity action. Other benefits it allows a smaller cloth pot to be used after transplanting a established clone from my RED SOLO CUP, LET's HAVE A PARTY.... which holds a base organic soil take your pick. Mine...
Black Gold potting soil the one with the mater on it...tomato on it.
Once my baby starts rooting past the bottom of her 3 gallon home nested (laying on top of wet rocks not submersed into the water) in the my passive hydro water system - I simply lift her up, shake of the silica rocks clinging to those roots and place her into a 5 gallon cloth pot of super soil nesting that back into my passive hydro system. Simple and easy transplant very little shock if any expect for when the roots sticking out the bottom of the 3 gallon pot now come into contact with sub cool's super soil. A good kind of shock like a jolt of red bull!
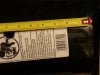
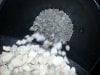
My passive hydro system is built from what I learned from Ed Rosenthal, it my version of the system though which is a a 5 Gallon bucket with a 1/4 inch drain hole at the the halfway mark in the depth of the bucket. Fill your the bucket halfway full of clean silica rock (Grow Stone) up to the drainage hole. *** Fill it up to the drain hole with distilled water, rain water, spring water, or well water anything that is clean up 150 ppm. Most of these are right at or near 7.0 ph.
The reason this works is per Ed our lovely lady's roots have two layers... thus passive hydro has two layers soil on top water on the bottom with a wick in the middle.
These two root layers are divided in that the top third primarily absorbs nutrients... the bottom third are designed primary for water intake.
The cloth pots give a nice gap between the 5 gallon bucket and the root system, giving plenty of air in the root zone.
Water is a breeze since the 5 gallon bucket reservoir half way full of rock will hold approx 1 gallon H20 in the rocks pre-soaked and cleaned. Thus allowing for more time between watering. At least so far in veg, we shall see as I take this system to flower.
Lights... 120 Watt 3 watt 8 band Led with 2 x 24 CFL. Going into flower will use total of 4x 2700K 24watt CLFs as supplemental to lower branches.
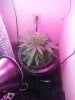
Anywise I attached a few pics for you to see the result of this combination.
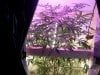
First one is Nine weeks after germination of a BlueCheese seed.

This second is at 12 and half weeks, she grew like a weed and I had to build her a new home.

This is recently after defoliation, I have removed most of the fan leaves allowing more light in.

I have taken clones from her now and waiting to ensue they are viable.once clones are deemed viable will flower their mommy no room left once clones take off.
Besides I think I've proven this system is viable time to enjoy the fruits of my labor.
Therefore I think my venture is to prepare to implement what I have learned from nugbuckets about main lining. I'm willing to learn and put in time training for main line if that increases yields which ultimately results in less work hopefully, that's my goal work smart not hard.
I think I've basically set the course for the lazy man's grow... or getting closer it seems for me at least.
My intention was to get the best of both worlds to get the plant to do all the work in watering and feeding itself.
I know it sounds a little lazy on my part, but hey I've always choose to work smart, not hard.
The passive hydroponic relies on a wicking system, keep in mind wicking is only as good and the medium for the wick and exposure it has to the reservoir. I use your standard cloth pot(s) now it serves multiple purposes. One air pruning of the roots which is very beneficial the second is the entirety of the bottom surface becomes the wick material for the roots to engage in capillarity action. Other benefits it allows a smaller cloth pot to be used after transplanting a established clone from my RED SOLO CUP, LET's HAVE A PARTY.... which holds a base organic soil take your pick. Mine...
Black Gold potting soil the one with the mater on it...tomato on it.
Once my baby starts rooting past the bottom of her 3 gallon home nested (laying on top of wet rocks not submersed into the water) in the my passive hydro water system - I simply lift her up, shake of the silica rocks clinging to those roots and place her into a 5 gallon cloth pot of super soil nesting that back into my passive hydro system. Simple and easy transplant very little shock if any expect for when the roots sticking out the bottom of the 3 gallon pot now come into contact with sub cool's super soil. A good kind of shock like a jolt of red bull!
My passive hydro system is built from what I learned from Ed Rosenthal, it my version of the system though which is a a 5 Gallon bucket with a 1/4 inch drain hole at the the halfway mark in the depth of the bucket. Fill your the bucket halfway full of clean silica rock (Grow Stone) up to the drainage hole. *** Fill it up to the drain hole with distilled water, rain water, spring water, or well water anything that is clean up 150 ppm. Most of these are right at or near 7.0 ph.
The reason this works is per Ed our lovely lady's roots have two layers... thus passive hydro has two layers soil on top water on the bottom with a wick in the middle.
These two root layers are divided in that the top third primarily absorbs nutrients... the bottom third are designed primary for water intake.
The cloth pots give a nice gap between the 5 gallon bucket and the root system, giving plenty of air in the root zone.
Water is a breeze since the 5 gallon bucket reservoir half way full of rock will hold approx 1 gallon H20 in the rocks pre-soaked and cleaned. Thus allowing for more time between watering. At least so far in veg, we shall see as I take this system to flower.
Lights... 120 Watt 3 watt 8 band Led with 2 x 24 CFL. Going into flower will use total of 4x 2700K 24watt CLFs as supplemental to lower branches.
Anywise I attached a few pics for you to see the result of this combination.
First one is Nine weeks after germination of a BlueCheese seed.
This second is at 12 and half weeks, she grew like a weed and I had to build her a new home.
This is recently after defoliation, I have removed most of the fan leaves allowing more light in.
I have taken clones from her now and waiting to ensue they are viable.once clones are deemed viable will flower their mommy no room left once clones take off.
Besides I think I've proven this system is viable time to enjoy the fruits of my labor.
Therefore I think my venture is to prepare to implement what I have learned from nugbuckets about main lining. I'm willing to learn and put in time training for main line if that increases yields which ultimately results in less work hopefully, that's my goal work smart not hard.