Latest DWC setup

forScience

New Member
Have been playing on and off with DWC systems for a bit, thought I would share my most recent hobby. The plan is to build two
identical systems, where I can exert as much control as is reasonable, and generate good data and good bud.

The aim here is to make something that can be consistent while minimizing maintenance. I have had some successes and
some setbacks. First, here is the system right now. The plants were taken from their clone tray a month ago. The mother that they came from has been ravaged by spider mites, and these clones ended up webbed within a week. I think they are recovering nicely. The runt in the front was barely two sticks and a couple of tiny leaves a month ago.

fullsys1.jpg

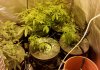
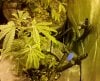
The plants are in 3.5 gallon buckets, which have the same width as the top of a 5 gallon. There is a custom built pallet under them which allows the water return lines to run under the buckets. Each planter bucket has an air stone. This setup is great because plants can be individually removed for maintenance/spraying, just pop the top off and toss it on another bucket.

There is an air stone in each bucket, and passive drain from the bottom. The recirculation is accomplished via a timed top feed pumped up from the resevoir. I use an interval timer for this, 15 seconds on 5 minutes off.

Bottom mounting and wanting to keep the stand simple lead me to use 1/2 inch tube with grommet connections. I like these but they can become clogged, as happened in one of the buckets. It overflowed a bit, maybe 3 liters. I like the larger fitting connections with screens on the back better, but, they would require a higher stand, and larger tubing, even more so.

recirc-close.jpg

I put 3 valves and 2 Tees on the output from the resevoir. This allows the recirculation pump to do double duty to empty the
system out. The valve on the far end then becomes the input, allowing me to top feed water or or a wash solution, while I drain.
I have another bucket with a float valve (not pictured) to feed water in. That float valve is special and can take pressure (note: Not all can, the local hydro shop confessed to having a flooding issue when they hooked tap water to a gravity feed float valve!), so I hook it up to the line tap (I am contemplating adding a filter)


recirc-close2.jpg

There you can see some of the water line. It is 1/4". You can get it and the compression fittings to connect it up at any hardware store. When the system is not being drained, I cover the res bucket, and toss a bucket full of water on top. That bucket is marked off in liters, and I just record the deltas every day when I check the PH and EC.

I am going to do a bit more pruning back and letting them grow for another couple of weeks, while I continue to treat the mites.I am thinking CO2 is the next logical addition, since it is a pretty well sealed up tent. 3x3x64. I will probably want to run one tank to two controllers, going to be pricy but should be worth it in the long run.
 

onthedl0008

Well-Known Member
This should be good im down to watch it alot of thought and determination to get it kicked off sounds like ur getting the kinks worked out and system dialed in.. Ur right on ur drainback tube id go as big as u can the bigger the root mass gets and sits in the buckets u will have issues with clogging still.. I started out with 3\4 inch but useing 1 inch now and still have to maintain diligently.
Ur biggest issues gonna be the mites stay on them remember its all preventative maintenance now since u had them u gotta act like u got them from here on out or they will catch u slipping..

Wheres ur ph and ppm sitting looks like there hungry and could use some greening up..
Otherwise good stuff and luck.
Peace
 

forScience

New Member
This should be good im down to watch it alot of thought and determination to get it kicked off sounds like ur getting the kinks worked out and system dialed in.. Ur right on ur drainback tube id go as big as u can the bigger the root mass gets and sits in the buckets u will have issues with clogging still.. I started out with 3\4 inch but useing 1 inch now and still have to maintain diligently.
Ur biggest issues gonna be the mites stay on them remember its all preventative maintenance now since u had them u gotta act like u got them from here on out or they will catch u slipping..

Wheres ur ph and ppm sitting looks like there hungry and could use some greening up..
Otherwise good stuff and luck.
Peace
They were hungry, I took the pics mid flush, so they are all fed up nice now. Since I have been putting off flowering and expecting to run long and prune back, I am not too worried about how fast they are growing, so I let the solution run long, why waste nutes just to prune it back?

After I go from the clone tray they are small with few roots, so I put them in at about 650 ppm. Normally, I wouldn't keep them a full month on that. I should probably raise it up. The no pest strips are doing a good job of making sure there are no live mites, so maybe if I get them growing fast, I can grow past the eggs and aggressively prune out all of the egg filled leaves.

As for the mites, I don't want to take a chance with the no pest strips, so once I go to my flowering cycle, I am going to remove those, air it out for a day or two, and introduce ladybugs.

Another thing I need to do is start mixing up my nute batches in their own container. What I have been doing is filling the system with water, and then adding nutes to the res, and letting it mix itself. Start taking measurements and making adjustments after 24 hours. This is probably more important as I plan to run 2 identical systems, and want to control any differences between them, as my first study is going to be looking at questions of the light cycle.
 

onthedl0008

Well-Known Member
They were hungry, I took the pics mid flush, so they are all fed up nice now. Since I have been putting off flowering and expecting to run long and prune back, I am not too worried about how fast they are growing, so I let the solution run long, why waste nutes just to prune it back?

After I go from the clone tray they are small with few roots, so I put them in at about 650 ppm. Normally, I wouldn't keep them a full month on that. I should probably raise it up. The no pest strips are doing a good job of making sure there are no live mites, so maybe if I get them growing fast, I can grow past the eggs and aggressively prune out all of the egg filled leaves.

As for the mites, I don't want to take a chance with the no pest strips, so once I go to my flowering cycle, I am going to remove those, air it out for a day or two, and introduce ladybugs.

Another thing I need to do is start mixing up my nute batches in their own container. What I have been doing is filling the system with water, and then adding nutes to the res, and letting it mix itself. Start taking measurements and making adjustments after 24 hours. This is probably more important as I plan to run 2 identical systems, and want to control any differences between them, as my first study is going to be looking at questions of the light cycle.
Cool man sounds like u have a plan..
I mix my nutes in my res the same way u mentioned after topoff make my adjustments check the next day repeat the process if needed.
To me ive noticed its harder to keep full control on whats going on in the res if u premix as the parts per million on a gallon with as much nutrients over the whole res is gonna change diluteing up ur never gonna get a totally accurate reading as the plants will be drinking the water back down so i like haveing full control on the res itself its the only to have complete control i guess...
Same with ph i would suggest to not mix seperately especially to anyone new to dwc. Acid levels will build as the plants use the water ph solution will remain in the tank and build over time ive made that mistake..Its best to top off allow ur water to acclimate to ur res temps and make proper adjustments from there.
 

forScience

New Member
That makes a lot of sense. My first few runs, there were a few times I put straight water under them and took readings. My water went from 100ppm out of the tap to 200-300 just washing salts off the roots and containers. That is one of the reasons I was thinking that flushing water in while I drain is probably a good idea.

Your point on tube size resonates here. I moved up to 3/4 because 1/2 is so maddeningly slow. However, I have trouble seeing how I use anything larger without losing an extra 6 to 8 inches between fittings, and that is hard to swallow in terms of either height or space between buckets.

That and the largest knockout bit I could find (such smooth clean holes, forget spades, I have a 100% success rate, which I can't say for spade bits) only goes up to 1 1/8". The fittings I have that I have won't fit through the hole, regardless of how perfect and smooth it is.

Though with a feed bucket and a pump out to a drain, it almost doesn't matter how long it takes; its not a labor intensive process.
 

onthedl0008

Well-Known Member
That makes a lot of sense. My first few runs, there were a few times I put straight water under them and took readings. My water went from 100ppm out of the tap to 200-300 just washing salts off the roots and containers. That is one of the reasons I was thinking that flushing water in while I drain is probably a good idea.

Your point on tube size resonates here. I moved up to 3/4 because 1/2 is so maddeningly slow. However, I have trouble seeing how I use anything larger without losing an extra 6 to 8 inches between fittings, and that is hard to swallow in terms of either height or space between buckets.

That and the largest knockout bit I could find (such smooth clean holes, forget spades, I have a 100% success rate, which I can't say for spade bits) only goes up to 1 1/8". The fittings I have that I have won't fit through the hole, regardless of how perfect and smooth it is.

Though with a feed bucket and a pump out to a drain, it almost doesn't matter how long it takes; its not a labor intensive process.
Yea man for sure u should be able to find a universal cone drill bit that range from 1/2 inch all the way up to 3 inch same all same bit u just gotta stop just slightly smaller for ur desired grommet size so its a tighter fit..
Also u can get a real cheap de-burring tool and even sand the lip if it matter i found it really doesnt ling as u cut smaller for tighter fit...

I hear u on water levels man i have have banged my head hard over this whole maintaining equal levels in my buckets and i got a pile of scrap buckets to prove it lol im useing them as props for my coco plants now haha anyhow heres a pic of what i came up with like revision number 5 now..

It all came down to the equalizer tube (draninback) for me in the picture its still 3/4 inch but like i said i changed it to 1inch due to clogs..
Anyhow thats all single level 4 bucket system with controller bucket pulling and pushing water thru the buckets yet maintaining equal levels thru the bu kets if u dont equalize u will flood ur front buckets before it gets back to the controller plain and simple..
On my bucket system all u gotta do is add water to the system till ur at desired level in the buckets real simple..
I got my chiller remote to my controller bucket outside flower pad but thats not pictured..

Sorry had to bump my rdwc thread i cant find a pic but its on first page of the thread..
 
Top