zoslick
Well-Known Member
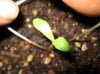
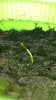
Can anyone here tell me whats going on with my seedling? I've grown over 10 plants but have never seen this kind of growth before.
Some details:
Strain: Chrystal from Nirvana Seeds
Feminised
Germinated in distilled water for 48 hours
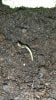
Planted in regular soil rated at pH 6.5 (also the same soil I used for my previous Wappa plants)
Watering: pH adjusted to 6.5 from regular tap
Lighting: 55watt CFL @ 7000k
Lighting period: 24 hours non stop
Germ Date: August 14
Plant Date: August 16
Current number of days in soil: 5
The seedling didn't grow until the 2nd day (approximately 48 hours until its head sprung out), then it grew a little the 3rd day, and hasn't grown since. The tip of the plant looks dark and flaky, the CFL light is approximately 3-4 inches away from the plant. No heat felt at that distance from the back of my hand.
Can anyone point out what the problem is? Or am I just too anxious?
Thanks!
Some details:
Strain: Chrystal from Nirvana Seeds
Feminised
Germinated in distilled water for 48 hours
Planted in regular soil rated at pH 6.5 (also the same soil I used for my previous Wappa plants)
Watering: pH adjusted to 6.5 from regular tap
Lighting: 55watt CFL @ 7000k
Lighting period: 24 hours non stop
Germ Date: August 14
Plant Date: August 16
Current number of days in soil: 5
The seedling didn't grow until the 2nd day (approximately 48 hours until its head sprung out), then it grew a little the 3rd day, and hasn't grown since. The tip of the plant looks dark and flaky, the CFL light is approximately 3-4 inches away from the plant. No heat felt at that distance from the back of my hand.
Can anyone point out what the problem is? Or am I just too anxious?
Thanks!
Attachments
-
 118.7 KB Views: 85
 -
 55.4 KB Views: 82