Mucky’s Female Seeds C99 EBB & Flow grow

MuckyDucky

Well-Known Member
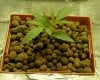
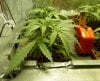
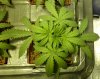
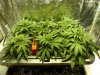
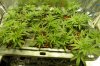
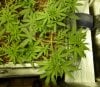
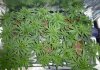
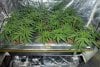
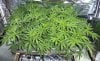
Hi all! This is my second grow using a DYI EBB & Flow system with the Lucas formula. The tent size is 2’ x 4’ x 7’ high. I will be using a 400w Mh & HPS light with GH Micro/Bloom, and RO water. I will be growing C99 this round, either a SCROG setup or topped for 4 main colas.
I have not started the seed yet so be patient. Hopefully they will be sprouted in a week and I’ll continue then.

Let’s start with the EBB & Flow. The cost for materials was roughly $120.00 if you have to buy all of the items.
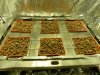
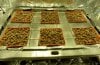
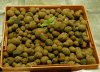
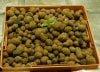
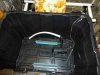
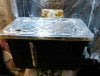
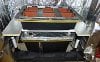
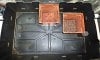
DYI EBB & Flow, 24” x 35”
1 – 27 gallon tote (with a flat yellow lid). Home Depot, $11.00
1 – 20 gal concrete mixing tub, Home depot $13.00
1 – 2’ x 4’ ¾” Foam Insulation, Home Depot – 4’ x 8’ sheet $16.00
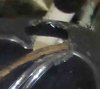
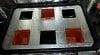
1 - EcoPlus 396 GPH Submersible Pump, about $15.00
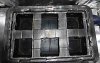
1 - Botanicare Ebb & Flow Fittings Kit, $5.00
Kit Contains:​
1, 1/2 inch bulk head fitting with nut & washer
1, 3/4 inch bulk head fitting with nut & washer
2 Extensions
2 Screens​
2 - 1/2 Inch Grommets, .$.60 each
4 - 1/2 Inch Elbows, $.39 each
1 - EcoPlus Air Pump Two Outlet, $12.00
1 - Digital Timer, $11.00

Misc:
2 Air 12” bar stones
1 package air stone tubing
1 tube aquarium silicone
½” black tubing, about 4 ft
½” clear tubing, about 2 ft
¾” black tubing, about 1 ft
A stand of some kind to hold the table above the res. I used 1 ¼” PCV pipe.
 

MuckyDucky

Well-Known Member
The Reservoir
Drill 2 holes for the water level indicator, 1 close to the bottom and one close to the top, stick in the ½” grommets, stick a 90deg elbow into each one, measure the distance, cut the clear ½” tubing to fit and assemble.
Water-Level-Indicator.jpg

Use the silicone to attach the air stones to the bottom of the res and let dry. Set the pump in place. I placed my pump on the opposite side from where the ½” bulk head would be and used a couple of 90 deg elbows with the black tubing to attach it. This was done so the tubing could be moved around without the risk of it crimping inside the res when I worked with it.
Res-inside-with-pump.jpg

Widen out one of the holes on the top of the res so the air tubing and power cord can go through without being crimped when the lid goes on it.
Power-cord.jpg
 

Attachments

MuckyDucky

Well-Known Member
The lid will need an access hole for filling and testing and... a hole for the fill tube and another for the overflow from the table. To determine where the holes will be place the flood table on it a drill 2 pilot holes through the table and lid where you intend to place the bulkheads. On the lid use a hole saw to make 2 holes large enough to slip the ½” and ¾” tubing through. I found a complete set of 12 hole saws online, 3/4” to 5” from Northern Tools, for under $20 including shipping.
View attachment 2904857

Drill out the holes for the bulkheads on the bottom of the flood table and install them. I am using a cut down 27 gal tote for the flood table but the mixing tub is easier to setup. I am including pictures of both. My table cover is a cut up tote lid and it was a lot of trouble to make. ¾” foam insulation is very easy to cut and to use.

View attachment 2904858


I am using a cut down tote with chopped up lid.
View attachment 2904859

Better idea!! Concrete mixing tub with ¾” foam insulation lid.
View attachment 2904860

Ok, now make a stand to hold the table and set everything in place. I used 1 ¼” PVC for the stand.
View attachment 2904861
 

MuckyDucky

Well-Known Member
OK, I put 8 C99's in damp towel on 11/23. All 8 popped!:mrgreen: This picture was taken on 11/27. That, my friends is only 4 total days and 6 of the 8 are already up. I'm giving Female Seeds a big thumbs up:clap:
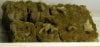
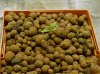
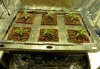
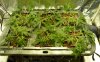
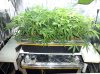
.. Too bad.... I only needed 4 plants:wall:
Seedpop.jpg
 

MuckyDucky

Well-Known Member
I put 6 of the seedlings in pots today. I am getting rid of the 2 smallest because I don't have anyplace to put them.

I may have to get rid of 2 of them because of space issues and just top them or SCROG with all 6. The PPM is 825 @.7 and the PH is around 6, lights at 18/6.

This is 7 days from starting the seeds.
potted-001.jpgpotted-close.jpg
 

MuckyDucky

Well-Known Member
It has been 7 days since the seedlings were put into the EBB&Flow. PPM is now 1200 @ .7. Here are some before/after to show the 7 days of growth.

Planted 11/30/13


7 days later 12/7/13


Planted 11/30/13


7 Days later 12/7/13


[HR][/HR][HR][/HR][HR][/HR]
The one on the left is one of the extra seedlings I couldn't make myself get rid of yet. It is exactly the same age as one growing in the grow rocks but it has been sitting out in indoor indirect lighting with no special care. It has basically not grown at all in the past 7 days. Hmmmm..
 

Attachments

MuckyDucky

Well-Known Member
These plants are going crazy with growth. They are only around 5" tall but if you measure the large leaves some are over 10" wide.... and they are only 14 days old! I fear I might have them crowded too tight. They are set at 9" spacing but the plants on each end can be trained to grow to the sides, away from the middle plants.

12/1 Planted
Just-planted-full.jpg

12/7 - 7 days old
one-week-full-view.jpg

12/14 - 14 days old
14-days-full.jpg

12/1 Planted
close-planted.jpg

12/7 - 7 days old
close-wk1.jpg

12/14 - 14 days old
close-14-days.jpg

14 days -- Largest is around 14" accross and 5" tall
14-days-top-shot-2.jpg
 

MuckyDucky

Well-Known Member
Looking good. Nice setup. Im subbed.
Thanks Grimmie. I see you have 3 c99 grows. I looked over the first one.. beautiful plants! Do you think 4 plants would be better than 6 in this 2x4 ft area? At first I thought I would throw the 6 into flower at 4 wks or so but the way the are growing maybe get rid of the 2 in the center and top/low stress train the other 4. What do you think?
 

xGrimace

Well-Known Member
4 would probably be more suitable for that area and lightning. Its truly up to you though. Your basically spreading out your yield between 6 plants.
Either way you have a great start here.
 

MuckyDucky

Well-Known Member
4 would probably be more suitable for that area and lightning. Its truly up to you though. Your basically spreading out your yield between 6 plants.
Either way you have a great start here.
I just couldn't kill 2 and I had no place to put em so I topped them leaving 4 mains on each one. They look terrible! :-?


looks great :)
What about now? :mrgreen:

18 Days
18-days-full.jpg

18 days after I got through with it!:evil:
18-days-chopped-full.jpg

19 days (today) recovering
19-days-full.jpg

19-days-close.jpg
 

Po boy

Well-Known Member
you'll love cindy weed. i harvested two a few months ago and it's excellent smoke and taste. get ready for the stretch! good thing they have short flowering times as they never stop stretching. GL
 

MuckyDucky

Well-Known Member
you'll love cindy weed. i harvested two a few months ago and it's excellent smoke and taste. get ready for the stretch! good thing they have short flowering times as they never stop stretching. GL
Oh Man! Don't tell me that!! That's happened with the first grow, White Widow, and when I changed to 12/12 they just kept stretching. It was suppose to be a SCROG but ended with a ton of small buds harvested by cutting the tops first, then the bottoms with all the popcorn a week later.a week later.
 

MuckyDucky

Well-Known Member
I switched to 12/12 today... still using 1 part micro to 2 parts bloom, PPM around 1300 @ .7, PH 5.3 to 5.7. Now we'll see how bad they stretch.
21-days-switched-to-12-12-004.jpg
21-days-switched-to-12-12-005.jpg
 

MuckyDucky

Well-Known Member
Strain: Female Seeds C99

Seeds sprouted on: 11/30/13
Total growing days: 28

Switched to 12/12 on: 12/21/13
Total veg days: 21

Total days under 12/12: 7
Started producing buds: 12/27/13
Total budding days: 1

Height: 11 inches

I have been filling the reservoir to 19 gallons and adding back RO water and nutes to bring ppm back up to 1260 @.7 when water level drops 3 gallons. I noted that the plants are taking in more nutes than the water consumed which may mean that I should increase the nutes in the reservoir until the strength of the water I add back only has to match the strength of the reservoir strength.

The PH decreases to around 5.0 after the 3 gallon drop but adding ¼ ML of PH up per gallon to the reservoir, that’s ML and NOT tsp, will bring the PH back up to around 6.0. I love the RO water! When I used tap water I was constantly adding a bunch of PH down to keep it in range.

It’s looking like a jungle in there! Right now I am leaving as many fan leaves on as possible. I think of the fan leaves as little mouths sucking up the light. More fan leaves=faster growing, healthier plants. On my next grow I may try lowering the tray as much as possible and grow 3 instead of 6 in this small space.

12-28-13-005.jpg
12-28-13-006.jpg
12-28-13-007.jpg
 
Top