400w HPS husky cab grow 6 plants... For real.

BCbudEZ

Member
So, after toying around a bit with the idea of growing, and experimenting with bringing a plant through stage... I'd say it was about time we made a nice cab. Here's the attempt:

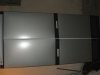
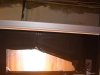
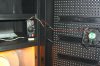
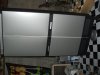
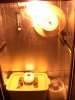
Husky grow cab... HD. Plastic with metal front, Sealed pretty well. We Heavy duty weather stripping at all leak points, so this cab is 100% light tight.

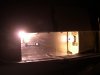
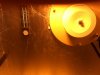
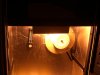
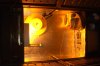
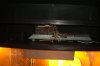
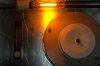
Currently installed is a 400w HPS with a newer bulb.It was an old parking lot light that I ditched the case to.

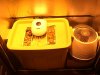
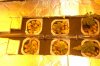
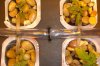
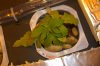
There's an 18 gal roughneck tote for a reservoir/bubble bucket, with some homemade elongated net pots. The plants were started in juffy pellets, which were placed in to the netpots, which were filled with lava rocks and topped off with aquarium stones.

There's a rather large air pump to 2 10" airstones in the res.

The closed cab temps stabalize at 72* air temp and 60* water temp. I guess the old hepa filter we robbed the cage fan from was pretty heavy duty.

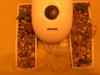
We just got a humidifier with percentage settings. It helps to keep the temps down, too.

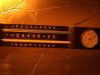
24 hour timer set to 18/6 schedule

Reflective foam core insulation/window blinds


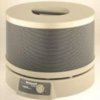
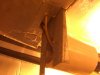
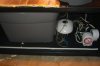
The only tools we needed were a philips head screwdriver, razor blade, and a soldering iron. For the main exhaust fan, we took apart an old honeywell hepa filter, and just mounted what we needed on the back wall of the cab.

Any questions, feel free to ask. Comments and sensible criticism always welcome.

There will probably be a scrog in our future.

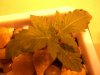
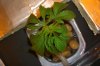
Oh, and the girls are 9 days old from seed.
 

Attachments

swelchjohn

New Member
this cab is fantastic. i have a much smaller op, but it's worth checking outhttps://www.rollitup.org/introduce-yourself/310370-introduction-100-watt-hps-cabinet.html . i'm looking foward to watching your thread:D
 

BCbudEZ

Member
Updates, More pics and a little more explanation of how we did the cab if you like the look of it. $166 at your local home depot. It's nice because any of the modifications to the cab can be done with just a soldering Iron. There'll be pics of whatever I talk about on the bottom, but unfortunately I didn't take any pictures during build, and I apologize.

The filter is an old honeywell brand HEPA filter that I picked up at the local thrift store for $2... Puts out a lot of air and easy to take apart. We just took the case off and made an exaust hole in the back of the cab, and mounted it as an air intake. There are completely sealed exhaust holes at the bottom of the doors to this cab, so the air comes from the top rear right of the cab and is pushed out evenly along the bottom of the doors. It works well to keep the temps below spec: Air is 75-80 water is at 60-70, and humidity is solid at 50-30% right now. The low end temps were taken at the end of the night cycle, and the high ones at the end of the light cycle.

We sealed around both doors with some rubber weather stripping from wall-mart... I think it's duck tape brand. $5 for well more than I needed.

The humidifier is a cheap 36 hour cycle Humidifier from walmart. Pretty nice considering I got it on clearance for $8. Well worth the money.

The light is an old 400w hps Parking lot light... We just mounted the bulb bracket to the bottom of our shelf, and put the ballast on the top of the shelf. It's almost completely isolated from the grow room, and I made an exhaust channel around it with some of the insulation I used as reflective material in the cab. There's a small PC case fan and a 13.8v power supply hooked up at one end to pull air through the channel. It runs warm, but not hot. We just poked holes in the plastic shelf to run the lightbulb wires through, and they ended up being a perfect fit. For reflectors, we just have most of the top of the cab covered with reflective insulation. There's a small peice of polished aluminum mounted there now just to keep the light out of our eyes when we're working on the plants.

We have an 18 gallon roughneck tote for a bubble res with two 10" airstones in right under our 10"x3" netpots. They were pencil baskets that I got from walmart 3 for a dollar. I just poked a bunch of holes in the bottom with a soldering Iron. 3 plants per pot.

It was a little windy in there and the runt of the litter got trounced... So we've given her a temporary humidity dome that's just a pop bottle.
 

Attachments

BCbudEZ

Member
Major updates, sorry it took so long!

We had to switch things up... Those netpot trays were not keeping the plants consistently hydrated, and as a result we almost lost two and stunted two, though two of them are growing into monsters. We made homemade netpots with pudding cups, and ran a central water line up to the drip tubes that feed the plants. Instead of using the tub lid, we put a shelf directly above the res, and used it to hold our netpots and feeder tubes. The humidifier is now set up to the right on the top of that shelf, and is much more easily accessible. The root growth on the weird looking monster is amazing, probably 4-5 inches long and there are alot of them. The water pump is set to 1 hour on every 24 hours. Those pellets dry out really quick, and it keeps them perfectly hydrated at all times. We also got rid of the ballast shield, and just put in another low shelf in the top of the cab. It's nice and warm up there, so We're going to see about cultivating magic mushees in the top.

please, tell us what you think! any criticism will be taken into consideration, even if you tell us that we're back woods retards.
 

Attachments

Delux83

Well-Known Member
Cab is sick bro love the DIY and this one is prime leafs look a lil droopy though over water maybe? btw sub wanna check it out
 

BCbudEZ

Member
Yeah, we got cheap timers, and when we came down this morning, we saw that it wasn't working properly... These plants were getting way too much water. We're getting a new timer in a couple hours though, no worries.
 

Smallsn

Well-Known Member
Subbed! Going to love to see the result. I just got a second=hand 400W HPS. Will start to do my own grow after i find a secured place. I got one in mind.
 
Top