joeybloggs
Member
Hi everyone.
So this year I decided to take a crack at growing my own. I am not entirely new to gardening, I grow some veg in the garden, beans, courgettes and so on, but this was my first ever attempt at growing bud. So anyone considering growing bud for the first time will probably find this post at least somewhat useful.
I kept a diary going throughout my grow, with loads of pics. This was for me to document my own progress and learn from my mistakes. I actually killed three plants a month before getting this one right, and it was in part thanks to those failures and the diary I kept for them that I was able to grow this one sucessfully.
The goal for me with this grow was to finish with a smokable result. I wasn’t going for super big, super strong or any of that. I just wanted to complete a grow cycle, take notes and learn. It was important to me to see what can be produced with the absolute simplest setup, utilising only the sun, soil wind, and rain, with as little interference as possible.
Ok so not to go on to much, let me get right into the details of my setup.
Strain: Berry Ryder Auto
Grow area: UK (London) outdoor, small single plant greenhouse
Pot size: 30L (8 gallon)
Growing medium: I made a mix of 50% Biobizz All Mix and 50% New Horizon Organic Multi-Purpose peat & moss free compost. I did not sterilise or PH regulate the soil. Used it straight out of the bag as is.
Nutrients: Tomorite. Only 2 feeds at the beginning of flowering.
Water: Straight from tap. I did test the water from the tap and it was pretty close to neutral anyway, so didn’t bother adjusting it.
The following are extracts from my diary. These were notes to myself, so if they read a bit srange just remember that its me talking to myself.
Day 1, April 6:
Berry Ryder sprouting cycle started
Day 2, April 7:
Berry Ryder sprouted and planted into Biobizz light mix soil (cup in propagator)
Day 8, April 13:
Berry Ryder has cleared the soil and first set of leaves have started to show. Healthy stem and dark green colour.
Day 10, April 15:
Have potted up into 30l pot. Soil is 50% biobizz allmix and 50% New Horizon organic & peat free multi-purpose compost. No additional nutes or lime added. Initial PH test on the soil mix showed around 7.0, so pretty neutral. Water test also showed 7.0 from the tap. Stored up some rain water and gave the pots a good watering about 5 days before putting plants in. Berry Ryder good dark colour, very healthy.
Day 14, April 19:
Berry doing well. A little slow down, second set of leaves are showing, but still tiny. Possibly in minor shock. Has been very windy and cloudy, also a little cold, 13c average dropping to 2c at night.
Day 16, April 21:
First sunny weekend. Second set of leaves still tiny, but definitely a marked difference in growth.
Day 17, April 22:
Temprature has dropped again. Around 10c or maybe even less, almost no sun but still some good growth. Second set of leaves still small, but starting to open up
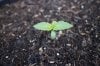
Day 18, April 23:
First photos. This picture was taken at 8.20am. Water on leaves is dew from last night. Have not watered plant since last Friday, but soil is still moist (not wet or soggy).

Day 25, April 30:
Growth accelerating + second photo. weather has been mild, average 15c, partly cloudy with some rain over the past week. plant is currently getting full direct sun from 10:45am till around 7pm (roughly 8 hours). looking dark and healthy. has been lightly windy this month and the stem has become strong and supports the plant well as a result. springs back to position with vigour when pushed. 3rd set of leaves now visible.

Day 31, May 6:
Berry showing amazing growth. Fantastic weather all weekend, good strong sun and the plant has shown an incredible growth spurt. It has really bushed out. First and second set of leaves have really fanned out. 3rd set of leaves have 3 fingers each and have fanned out nicely but are not full size yet (judging by the size that the first and second set have grown to). 4th set of leaves are still small but growing fast.
Day 32, May 7:
Photos:


Day 39. May 14:
Berry looking very health. Larger leaves not as dark, but I think thats natural. Looks very happy. measured in at around 8cm high.


Day 45, May 20:
Photo update. Berry's growth spurt is going strong. has grown to around 12cm and looks really healthy. Stem is thick and strong. Shoots have developed at all of the leaf bases, so I think she will bush out nicely. Have not tried to sex it yet, will try this weekend. Decided not to stress train, just gonna let her grow naturally. Berry was started when it was still quite cold and the days were short, so I think that might have slowed growth down overall, because for an autoflower, from what I have read she should already be flowering.


Day 52, May 28:
Photo update. Berry is 52cm! And I think its a female. I examined the berry today to measure (she's 52cm!!) and see if I could determine the sex and I spotted what looks like white tendrils at a potential bud site! I think we can call the berry a girl! should know for sure within the next week or so. Growth spurt is off the hook!

Day 55, May 31:
Berry is definitely female.


Day 59, June 4:
Berry is now 65cm.
Day 65, June 10:
Photo update. Berry now fully in flower mode. Spotted several bud sites. She seems to have levelled off at 65cm ish. Smells lovely in the tent, but smell doesn't linger and you can't smell her from more than a meter away. Have decided to try some nutes, even though shes showing no signs of deficiency. Tomorite with seaweed extract. NPK 4-3-8. Gave her 5ml diluted in 2L water. Bottle said 20ml in 4L, so given at 1/2 strength ratio. Lets see what happens!


Day 66, June 11:
Tomorite must encourage mould or something, found a cluster of little mushrooms sprouted overnight in the pot. Also spotted a red aphid looking thing on the plant. Only one. got rid of it.
Day 68, June 13:
Photos:


Day 74, June 19:
Photo update. 2nd feed of tomorite - 10ml/2L. Berry looking very healthy. Keep checking for bugs, but nothing bad going on. Removed the occasional aphid, but nothing to be concerned about. Put the greenhouse cover over on monday, but not zipped up.


Day 76, June 21:
Saw 3 aphids on berry. removed aphids and added 3 basil plants. At the base of the Berry to help ward off and unwanted guests. Some time on google revealed that basil is apparently a natural deterent against aphids and a host of other nasties. Also noticed one of the leaves towards the bottom of the plant had been attacked by a hungry slug. laid down salt around the base of the greenhouse.
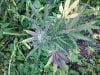
Day 95, July 10:
Just got back from 2 weeks holiday. Berry is looking amazing. Totally shocked by the immense progress! She has filling out beautifully. Main cola is impressive! Trichomes everywhere. Examined with 40x loupe. Most are still clear, some milky. No ambers yet, however the pistils are starting to turn brown. There are still plenty of white pistils, about 15% are brown at a guess. Smell is formidable! quite a harsh smell actually, like a young wine. I can't really smell any berry, but I guess it does have a fruity sort of smell. Noticed a few black fly aphids. Ordered lady bird larvae which should sort them out. Have decided against tomorite, so no more feeds. Shes super healthy, slight yellowing on the large leaves, but from what I’ve read, that’s perfectly normal at this stage.


Day 100, July 15:


Day 103, July 18:
Almost no aphids left, have been picking off as I spot them. Lady bird Larvae arrived and put on plants today (6pm). Some crumbs, possibly bread crumbs, from the large container fell onto the plant. To many and too small to take off, can't shake plant without shaking off larvae. Hope they don't cause any mould.
Cant tell if trichs are clouding up. I'm pretty sure some have, but a lot still look clear to me. My lack of experience is showing here. Some pistils have turned brown, but 70% still white.
Have had 3 weeks of blistering heatwave - 25 to 30c with no rain at all. have kept well watered, but will start allowing her to dry out more, heard it helps boost resin.
Need to harvest by monday 29th July at latest (in-laws visiting on 12th August, so need to dry and have in curing jars by then). Hoping they ripen by then.
this is day 39 of flowering, day 101 of total growth from the day we put sprouted seed into soil. This has taken a lot longer than the auto flower estimates I found in research. Shes also a formidable height for an auto at 75cm. Not at all upset about the timings, just surprised.
Day 106, July 21:
Ok I was starting to get nervous after reading that some autos don’t really get amber trichs. Most on the plant are cloudy, say 70 to 80%. I decided to wait no longer and harvested her today. When I was finished grooming her the scissors were full of resin! so I scraped it off, rolled it into a (small) ball and put it in a glass test tube. I then heated the test tube up until all the resin was red and smoking, then sucked up the smoke. There was only a tiny amount of smoke, about half a drag on a normal joint, but to my surprise it did have an effect! was a nice slow creeper, about 5 minutes afterwards I had a nice buzz going! A very very nice vibe, super chilled but active too, not like a couch potato. So if thats just a small teaser of what this plant is like, oh this is going to be kick ass. I took all the clippings that had crystals on them and made some canna-butter. Not wasting any of this stuff! A bit paniced that I’ve chopped her down too soon. But its done now, time will tell.


Day 108, July 23:
Buds are drying beautifully. This is day 3 and nothing is crispy yet. The thinest stalks are starting to show some stiffness, but everything is still very soft and moist. Crystals are looking more pronounced now. Considering the size and quantity of the buds, which is relatively small by comparison to some of the christmas trees I've seen online, its drying very slowly, which is good. Absolutely no mold at all and smell is wonderful. Still has a lot of green to the smell, but the berry flavours are becoming much more pronounced.
I'm hoping I can stretch the drying process to saturday which will mean it slow dried for 1 week. I've started restricting airflow a bit by turning off the fan (which is set to low and placed about 35cm/14in away from the ventilation holes) off for a few hours. Will try fan on, fan off for a few hours at time, and slowly reduce fan time over the next few days so that it does not dry out too quickly. humidity in the room is around 40%, probably closer to 50% in the box at a guess.
Day 110, July 25:
Checked berry this morning and was feeling dry but still spongy. Large stems crack when squeezed. Smaller branches were still a little pliable and didn't crack when bent. I was planning on waiting until they snap before putting in curing jars, but now im finding a lot of people saying not to dry it to that extent, but rather start the curing process while the stems are still a little pliable. Trimmed excess stalks and filled two small jars for curing. Fingers smell very sweet after handling. The berry smell comes across right away, followed be a hint of black pepper, similar to Swazi. Without touching her she still smells very grassy and quite sharp. I'm assuming that will smooth out during the cure and give way to the lovey berry and pepper smells. Intending to burp it every 6 to 12 hours for first week, then consider leaving it longer.


Day 111, July 26:
Burped and took all the bud out for an hour then repacked. No mould or condensation in the jars. Spell is definitely smothing out already. I could not resist picking a small popcorn bud out for a smoke test. Wow, so impressed! Again, same as with the hash, very slow start. Took about 6 minutes before I really felt stoned. But what an amazing high. It chilled me out massively, but not couchlock. I felt very active and was able to do things and concerntrate well. I was lucky enough to get my hands on some good home grown White Widow while on holliday, grown by seasoned growers. That was very good smoke, but I actually think this is stronger, and it seemed to last for ages, a good 2 hours or so.
And that’s it, up to date. I’ll update this thread later as the curing process contines. Dont have an accurate scale, so not weighing her. But at a guess I'd say I've got maybe 2oz here. Overall I’m really impressed with the results, especially considering how little effort was needed. No special lights, so complex nutes, just earth, wind, rain and sun… and a little tomorite.
Thanks for reading, hope this helps anyone out there considering their own grow. Sorry for boring the hell out of anyone. I know I can get a bigger crop or stronger bud in future, but for a first grow with nothing but a seed I am really happy with the outcome. This stash is my pride and joy at the moment! Thanks to everyone else who shared their grow diaries, I have read so many on here and they really do help us noobs!
So this year I decided to take a crack at growing my own. I am not entirely new to gardening, I grow some veg in the garden, beans, courgettes and so on, but this was my first ever attempt at growing bud. So anyone considering growing bud for the first time will probably find this post at least somewhat useful.
I kept a diary going throughout my grow, with loads of pics. This was for me to document my own progress and learn from my mistakes. I actually killed three plants a month before getting this one right, and it was in part thanks to those failures and the diary I kept for them that I was able to grow this one sucessfully.
The goal for me with this grow was to finish with a smokable result. I wasn’t going for super big, super strong or any of that. I just wanted to complete a grow cycle, take notes and learn. It was important to me to see what can be produced with the absolute simplest setup, utilising only the sun, soil wind, and rain, with as little interference as possible.
Ok so not to go on to much, let me get right into the details of my setup.
Strain: Berry Ryder Auto
Grow area: UK (London) outdoor, small single plant greenhouse
Pot size: 30L (8 gallon)
Growing medium: I made a mix of 50% Biobizz All Mix and 50% New Horizon Organic Multi-Purpose peat & moss free compost. I did not sterilise or PH regulate the soil. Used it straight out of the bag as is.
Nutrients: Tomorite. Only 2 feeds at the beginning of flowering.
Water: Straight from tap. I did test the water from the tap and it was pretty close to neutral anyway, so didn’t bother adjusting it.
The following are extracts from my diary. These were notes to myself, so if they read a bit srange just remember that its me talking to myself.
Day 1, April 6:
Berry Ryder sprouting cycle started
Day 2, April 7:
Berry Ryder sprouted and planted into Biobizz light mix soil (cup in propagator)
Day 8, April 13:
Berry Ryder has cleared the soil and first set of leaves have started to show. Healthy stem and dark green colour.
Day 10, April 15:
Have potted up into 30l pot. Soil is 50% biobizz allmix and 50% New Horizon organic & peat free multi-purpose compost. No additional nutes or lime added. Initial PH test on the soil mix showed around 7.0, so pretty neutral. Water test also showed 7.0 from the tap. Stored up some rain water and gave the pots a good watering about 5 days before putting plants in. Berry Ryder good dark colour, very healthy.
Day 14, April 19:
Berry doing well. A little slow down, second set of leaves are showing, but still tiny. Possibly in minor shock. Has been very windy and cloudy, also a little cold, 13c average dropping to 2c at night.
Day 16, April 21:
First sunny weekend. Second set of leaves still tiny, but definitely a marked difference in growth.
Day 17, April 22:
Temprature has dropped again. Around 10c or maybe even less, almost no sun but still some good growth. Second set of leaves still small, but starting to open up
Day 18, April 23:
First photos. This picture was taken at 8.20am. Water on leaves is dew from last night. Have not watered plant since last Friday, but soil is still moist (not wet or soggy).
Day 25, April 30:
Growth accelerating + second photo. weather has been mild, average 15c, partly cloudy with some rain over the past week. plant is currently getting full direct sun from 10:45am till around 7pm (roughly 8 hours). looking dark and healthy. has been lightly windy this month and the stem has become strong and supports the plant well as a result. springs back to position with vigour when pushed. 3rd set of leaves now visible.
Day 31, May 6:
Berry showing amazing growth. Fantastic weather all weekend, good strong sun and the plant has shown an incredible growth spurt. It has really bushed out. First and second set of leaves have really fanned out. 3rd set of leaves have 3 fingers each and have fanned out nicely but are not full size yet (judging by the size that the first and second set have grown to). 4th set of leaves are still small but growing fast.
Day 32, May 7:
Photos:
Day 39. May 14:
Berry looking very health. Larger leaves not as dark, but I think thats natural. Looks very happy. measured in at around 8cm high.
Day 45, May 20:
Photo update. Berry's growth spurt is going strong. has grown to around 12cm and looks really healthy. Stem is thick and strong. Shoots have developed at all of the leaf bases, so I think she will bush out nicely. Have not tried to sex it yet, will try this weekend. Decided not to stress train, just gonna let her grow naturally. Berry was started when it was still quite cold and the days were short, so I think that might have slowed growth down overall, because for an autoflower, from what I have read she should already be flowering.
Day 52, May 28:
Photo update. Berry is 52cm! And I think its a female. I examined the berry today to measure (she's 52cm!!) and see if I could determine the sex and I spotted what looks like white tendrils at a potential bud site! I think we can call the berry a girl! should know for sure within the next week or so. Growth spurt is off the hook!
Day 55, May 31:
Berry is definitely female.
Day 59, June 4:
Berry is now 65cm.
Day 65, June 10:
Photo update. Berry now fully in flower mode. Spotted several bud sites. She seems to have levelled off at 65cm ish. Smells lovely in the tent, but smell doesn't linger and you can't smell her from more than a meter away. Have decided to try some nutes, even though shes showing no signs of deficiency. Tomorite with seaweed extract. NPK 4-3-8. Gave her 5ml diluted in 2L water. Bottle said 20ml in 4L, so given at 1/2 strength ratio. Lets see what happens!
Day 66, June 11:
Tomorite must encourage mould or something, found a cluster of little mushrooms sprouted overnight in the pot. Also spotted a red aphid looking thing on the plant. Only one. got rid of it.
Day 68, June 13:
Photos:
Day 74, June 19:
Photo update. 2nd feed of tomorite - 10ml/2L. Berry looking very healthy. Keep checking for bugs, but nothing bad going on. Removed the occasional aphid, but nothing to be concerned about. Put the greenhouse cover over on monday, but not zipped up.
Day 76, June 21:
Saw 3 aphids on berry. removed aphids and added 3 basil plants. At the base of the Berry to help ward off and unwanted guests. Some time on google revealed that basil is apparently a natural deterent against aphids and a host of other nasties. Also noticed one of the leaves towards the bottom of the plant had been attacked by a hungry slug. laid down salt around the base of the greenhouse.
Day 95, July 10:
Just got back from 2 weeks holiday. Berry is looking amazing. Totally shocked by the immense progress! She has filling out beautifully. Main cola is impressive! Trichomes everywhere. Examined with 40x loupe. Most are still clear, some milky. No ambers yet, however the pistils are starting to turn brown. There are still plenty of white pistils, about 15% are brown at a guess. Smell is formidable! quite a harsh smell actually, like a young wine. I can't really smell any berry, but I guess it does have a fruity sort of smell. Noticed a few black fly aphids. Ordered lady bird larvae which should sort them out. Have decided against tomorite, so no more feeds. Shes super healthy, slight yellowing on the large leaves, but from what I’ve read, that’s perfectly normal at this stage.
Day 100, July 15:
Day 103, July 18:
Almost no aphids left, have been picking off as I spot them. Lady bird Larvae arrived and put on plants today (6pm). Some crumbs, possibly bread crumbs, from the large container fell onto the plant. To many and too small to take off, can't shake plant without shaking off larvae. Hope they don't cause any mould.
Cant tell if trichs are clouding up. I'm pretty sure some have, but a lot still look clear to me. My lack of experience is showing here. Some pistils have turned brown, but 70% still white.
Have had 3 weeks of blistering heatwave - 25 to 30c with no rain at all. have kept well watered, but will start allowing her to dry out more, heard it helps boost resin.
Need to harvest by monday 29th July at latest (in-laws visiting on 12th August, so need to dry and have in curing jars by then). Hoping they ripen by then.
this is day 39 of flowering, day 101 of total growth from the day we put sprouted seed into soil. This has taken a lot longer than the auto flower estimates I found in research. Shes also a formidable height for an auto at 75cm. Not at all upset about the timings, just surprised.
Day 106, July 21:
Ok I was starting to get nervous after reading that some autos don’t really get amber trichs. Most on the plant are cloudy, say 70 to 80%. I decided to wait no longer and harvested her today. When I was finished grooming her the scissors were full of resin! so I scraped it off, rolled it into a (small) ball and put it in a glass test tube. I then heated the test tube up until all the resin was red and smoking, then sucked up the smoke. There was only a tiny amount of smoke, about half a drag on a normal joint, but to my surprise it did have an effect! was a nice slow creeper, about 5 minutes afterwards I had a nice buzz going! A very very nice vibe, super chilled but active too, not like a couch potato. So if thats just a small teaser of what this plant is like, oh this is going to be kick ass. I took all the clippings that had crystals on them and made some canna-butter. Not wasting any of this stuff! A bit paniced that I’ve chopped her down too soon. But its done now, time will tell.
Day 108, July 23:
Buds are drying beautifully. This is day 3 and nothing is crispy yet. The thinest stalks are starting to show some stiffness, but everything is still very soft and moist. Crystals are looking more pronounced now. Considering the size and quantity of the buds, which is relatively small by comparison to some of the christmas trees I've seen online, its drying very slowly, which is good. Absolutely no mold at all and smell is wonderful. Still has a lot of green to the smell, but the berry flavours are becoming much more pronounced.
I'm hoping I can stretch the drying process to saturday which will mean it slow dried for 1 week. I've started restricting airflow a bit by turning off the fan (which is set to low and placed about 35cm/14in away from the ventilation holes) off for a few hours. Will try fan on, fan off for a few hours at time, and slowly reduce fan time over the next few days so that it does not dry out too quickly. humidity in the room is around 40%, probably closer to 50% in the box at a guess.
Day 110, July 25:
Checked berry this morning and was feeling dry but still spongy. Large stems crack when squeezed. Smaller branches were still a little pliable and didn't crack when bent. I was planning on waiting until they snap before putting in curing jars, but now im finding a lot of people saying not to dry it to that extent, but rather start the curing process while the stems are still a little pliable. Trimmed excess stalks and filled two small jars for curing. Fingers smell very sweet after handling. The berry smell comes across right away, followed be a hint of black pepper, similar to Swazi. Without touching her she still smells very grassy and quite sharp. I'm assuming that will smooth out during the cure and give way to the lovey berry and pepper smells. Intending to burp it every 6 to 12 hours for first week, then consider leaving it longer.
Day 111, July 26:
Burped and took all the bud out for an hour then repacked. No mould or condensation in the jars. Spell is definitely smothing out already. I could not resist picking a small popcorn bud out for a smoke test. Wow, so impressed! Again, same as with the hash, very slow start. Took about 6 minutes before I really felt stoned. But what an amazing high. It chilled me out massively, but not couchlock. I felt very active and was able to do things and concerntrate well. I was lucky enough to get my hands on some good home grown White Widow while on holliday, grown by seasoned growers. That was very good smoke, but I actually think this is stronger, and it seemed to last for ages, a good 2 hours or so.
And that’s it, up to date. I’ll update this thread later as the curing process contines. Dont have an accurate scale, so not weighing her. But at a guess I'd say I've got maybe 2oz here. Overall I’m really impressed with the results, especially considering how little effort was needed. No special lights, so complex nutes, just earth, wind, rain and sun… and a little tomorite.
Thanks for reading, hope this helps anyone out there considering their own grow. Sorry for boring the hell out of anyone. I know I can get a bigger crop or stronger bud in future, but for a first grow with nothing but a seed I am really happy with the outcome. This stash is my pride and joy at the moment! Thanks to everyone else who shared their grow diaries, I have read so many on here and they really do help us noobs!