ONE MORE TIME Around FOR THE OLD MAN in The Wardrobe Grow

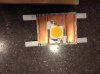
Last night I went with 20 Ga Solid Gauge copper....I was using 16AWG strand before and I kept having the wires tug out of the ideal holders and seems others have have the SAME problem recently......I highly suggest the littler gauge for them...worked like a charm! :peace:

This is solid advice... 20awg solid core stays in so much easier than 16AWG.. I had the exact same issue!

If you do have stranded, it's been suggested by a few members to tin the wire ends before sticking into the connector to help stop it from coming out.
 
View attachment 3370372 there you have it, both head sinks drilled, tapped and the holders screwed down tight, all 4 contact points are hitting the heat sink underneath, ,, ANY IDEAS on putting on the thermal paste?, thick, thin? I have to work the next 2 days, so when i get time its thermal paste and wires,

Also, nice work! Did you get to see them lit up yet?
 
when you get comfortable tapping those holes, you can use that dewalt drill with the slip clutch set to 1 and just put the tap in that. I've had 100% success with that method. The one time I broke a tap was because I did NOT use the slip clutch and bottomed out. I stopped using the hand chuck that came with my tap+die kit after about 8 holes.

2 drills make every project easier.
 
I can't tell you how many heat sinks I have with 3-4 holes in them. Lol

lol.. one time I was so stubborn after breaking a screw head off, I drilled a circle of holes around a broken screw to get it out.... It's using 3 screws now obviously... (was a vero29 so started with 4) and has a giant crater in one of the corners... :P
 
This is solid advice... 20awg solid core stays in so much easier than 16AWG.. I had the exact same issue!

If you do have stranded, it's been suggested by a few members to tin the wire ends before sticking into the connector to help stop it from coming out.
@churchhaze

I followed your input church, so I want to say thank you for that...the 20 awg copper is really a great fit...and the tinning is a good point...In the future I will have to work on that....:peace:
 
@churchhaze

I followed your input church, so I want to say thank you for that...the 20 awg copper is really a great fit...and the tinning is a good point...In the future I will have to work on that....:peace:
I am going to use the recomended wire size from you guys ! ! !, thanks for the experienced advice , I am a firm believer in not making the same mistake twice ( there is forgivness if your stoned! ) I am pretty sure I got lucky and the wire i have is 20 awg, i was looking at the spools for sale at the hardware store, then the young hardware kid/ employee who was helping me stuck the piece of test wire i brought from home to compare right into my cob holder, and BAM its stuck in it and the wire is only like 1 inch long,,, crap!!! thanks boy, ( I was nice to him),, but shit I thought I was now going to have to work with the short piece with solder and heat shrink to make it look good. but I tugged and I tugged on it, the cob holder felt strong and the wire eventually slide out, and now I can see just exactly how the wire is grabbed a hold of inside the cod holder, plus there are 2 of these wire holes on each side, one pair for negative and one pair for positive, so I could have cut the wire off and stuck a new one in the second hole, my guess is they did this so you can wire them more easily in series if you wanted too
 
Less is more.....spreading to the thinnest possible in theory is where the least thermal impedance comes in [the whole reason for the thermal paste]....

that being said, COB's aren't too finicky...I have seen installs range from just below gloppy to thin lizzy...lol...my experience initially was from mounting CPU's to heatsinks for Computer builds.....here is it recommended to obtain the thinnest possible line, because again, we are trying to minimize thermal impedance with the paste, basically smoothing out stresses in the metal face of the contact area between heatsink and the LED metal slug on the back of the LES [light emitting surface].

I advocate for the thinnest line you can achieve, but I don't think it matter whether you apply it to the heatsink or the cob 1st...personally I like the cob, in my mind seems easier to control the amount of surface area....

I little piece of cardboard makes an excellent spreader, I don't recommend the razor, because you could just cause needless damage.....

How does it feel to be on the cutting edge.....those holder mounts look bad azz :peace: :joint:
I am a really big fan of your idea to smear the thermal pastes onto the back of the cob, this of course, ( I will test a few times with a piec of cardboard on something smooth like a dinner plate),, Then I can click the cob into the holder, and then screw the holder down to the heat sink, thanks for the thermal Plan!
 
I am a really big fan of your idea to smear the thermal pastes onto the back of the cob, this of course, ( I will test a few times with a piec of cardboard on something smooth like a dinner plate),, Then I can click the cob into the holder, and then screw the holder down to the heat sink, thanks for the thermal Plan!
 
Thank you so much your right in step with where I am at, and your exposures to this stuff ahead of me is really helping
 
The suspense is killing me, looks really good though. Good job on getting the holder's mounted to the heat sinks. Good call on warming up the thermal paste as well that can be a bitch sometimes
 
All right its time to reveal my master plan ( in pictures at least). Before i go about applying the thermal paste and the cob , just to power it up like a new christmas present, the thinker side of me interupted and said, " you really should build the aluminum frame like Abiqua is using first, that way during construction of the hanger frame and drilling and fitting of all the parts and running the wires the cobs are safe in their packaging they were shipped. Also I am still amazed at the small size of the overall cob assembly, for anyone who has never seen one you can compare to my average sized hands or the sharpie pen on the end tableIMG_7575.JPGIMG_7576.JPG IMG_7577.JPG
 
so in this next picture you will see the cob setting next to the left of the mars LED frame, there will be a cob on the left and the right of the LED housing when finished, so there are 4 pc fans in a row here, all adjusted in speed for stealth. and the piece of wood in the photo is for referance point, picture switching the wood for aluminum angle , So i need to make a trip to home depot for the metal parts, IMG_7578.JPGIMG_7578.JPG IMG_7579.JPG IMG_7581.JPG
 
Its my Friday, and wow am I very stoned and relaxed, what does this have to do with my light build, not much, but I did purchase an 8 foot piece of aluminum angle to make the cob frame out of at home depot yesterday, i would take a picture of the angle aluminum, but my pipe is closer, sorry but its my friday
 
I used a piece of angle aluminum a while back for a light rack. Cheap and easy too.
image.jpg image.jpg
That last one though was my first attempt at mounting a 3070 to a heat sink.:spew:
 

Attachments

  • image.jpg
    image.jpg
    693.5 KB · Views: 56
  • image.jpg
    image.jpg
    691.9 KB · Views: 58
Last edited:
Back
Top