i'm doin this diy by request of a few guys on here. i wish i would have taken pictures while i was building it..but oh well. i guess ill start out sayin this is my first DIY (so beware), and ive never really been very good at explaining things but ill do my best, if ya got a question, just ask away. didnt really spend much time on this build since i wasnt sure how good it was going to work...well it works great, i use the shit out of my tumbler and get lots of nice dry sift hash...or keif...whatever you wanna call it.
i built this, like most other things i build, as cheaply as possible. most of the stuff i used came from shit we've collected over the years on the farm so they were free so i cant be too sure what it may cost you to build one...my guess would be around 50 bucks. when i get some free time i plan on re-building the box to make it look a little nicer...and build a lid for it as well.


This is what I used, sizes and materials can be changed to suit your needs. sorry if i forget something..
Materials Needed:
Box
1/4 inch plexiglass cut into pieces in these sizes: 2 - 16x14, 2 - 21.5x14, 1 - 21.75x17.5
1 - 25 inch x 19.5 inch piece of 3/4 plywood.
11 - metal corner brackets.
19 - 1/4-20 x 1 inch bolts with nuts.
11 - 1/4-20 x 1.75 inch bolts with nuts.
2 - 3 inch x 3 inch 3/4 plywood pieces.
Tumbler
5 feet of 1/4-20 threaded rod.
16 1/4-20 hex nuts and flat washers.
3 - 1/4-20 step bolts with wing nuts.
24 inches of 3/8 threaded rod.
6 - 3/8 nuts.
1 - 6 inch piece of flat bar for crank handle.
1 - 3/8 x 2 inch bolt with 4 nuts.
3/8 inch wide pvc tape..or foam tape.
small piece of 1/4" plywood. 6.5" x 6.5"
screen mesh of your choice. i used silk screen that is 125 mesh from this site www.poconoscreen.com
so, to build the box you just cut your plexiglass...be sure to notch out a section in the bottom of the piece you plan on using for the front so you have room to slide your drawer out...and then drill some holes and use your angle brackets and 1 inch 1/4-20 bolts to hold it all together...like this..

then get your 25x19.5 piece of plywood and attach your plexiglass box to the plywood using the remaining brackets and the 1.75 inch 1/4-20 bolts...like this..

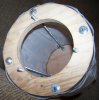
next get your 3x3 plywood blocks and drill 4 1/4 inch holes near the corners of each block, and drill a half inch hole in the center of each. then on one, cut a slot to the hole that you drilled in the center. get them centered on the inside of the left and right sides of your plexiglass box and drills some holes and bolt them in with your 1/4-20 bolts. then drill a hole through the plexiglass where you drilled the center hole on the non-slotted block...they should look like this when done...
here's a pattern i drew for the blocks.


at this point the box is complete, and should look something like this..

now for the tumbler. start by drawing your pattern for the end caps. mine is 8 inches in diameter. here are the patterns i drew on autocad..i kept them original size you may be able to print them out and use mine.


once you get those cut out, drill all the smaller holes on the pattern with a 1/4 inch drill bit and drill the bigger center holes out with a 3/8 or 1/2 inch drill bit. then put the 3 step bolts in the holes on the end cap that you cut the center out of, they are used to hold the lid on. then put a 5 inch length of your 3/8 threaded rod threw the center hole you drilled in the other end cap and secure it with nuts and washers on both sides. then cut your 1/4-20 threaded rod in 4 equal length pieces. put the two end caps together with your threaded rod, washers and nuts. i put a nut and washer on the inside and outside of the end caps so it all stayed solid. it should look like this...


next, the lid. i cut my lid out of 1/4 inch plywood..just a scrap piece i found laying around. cut a piece of 3/8 threaded rod to a length of 3 inches. put it threw the center hole in your lid and secure it with nuts and washers on both sides. here is a front and back shot of my lid.


then the fun part, stapling your screen to the tube you just built. it would be easier with 2 people, but like everything else, i did it by myself and it took a while lol. take your foam tape and run it around the edges of your end caps, you can see it in the pictures above, its the black between the screen and end caps. then cut out your screen and starting from one end, staple it on there, pull it tight and staple it all the way around. after you get it stapled on, get yourself a needle and thread and sew the seam of the screen together. then screw your lid on using the wing nuts and your tumbler tube is complete...it should look something like this...


then i made my crank handle, its real simple. just a piece of flat metal with a hole drilled at both ends, one end has a 8.5 inch length of 3/8 threaded rod attached to it and the other has a 1/4-20 bolt coming out of it for something to grab onto and turn the crank. i got stumped for a bit on how to make it easy to disconnect the crank handle and pull out the tumbler and i came up with this. its a piece of aluminum rod that i drilled the center out of so it could slide over the 3/8 threaded rod coming out of the tumbler and the crank handle. then i drilled holes through the aluminum piece and threaded rods at the same time and threw some hitch pin clips in there..it all looks like this...


here is the other end when the tumbler is in the box and ready to go. and the crank installed...the black tape is on there cuz it was squeaking when i turned the crank..


just load it up with frozen trim and/or bud, screw the lid on, put the tumbler in the box and connect the crank with the clips and you're good to go. i plan on getting a bbq rotisserie motor when i re-build the box...turning it by hand kinda sucks...
if i forgot to mention something or you have any questions, dont be affraid to say something...i smoked a lot of weed while writing this up so there may be some things i missed or things that dont make sense lol
i built this, like most other things i build, as cheaply as possible. most of the stuff i used came from shit we've collected over the years on the farm so they were free so i cant be too sure what it may cost you to build one...my guess would be around 50 bucks. when i get some free time i plan on re-building the box to make it look a little nicer...and build a lid for it as well.
This is what I used, sizes and materials can be changed to suit your needs. sorry if i forget something..
Materials Needed:
Box
1/4 inch plexiglass cut into pieces in these sizes: 2 - 16x14, 2 - 21.5x14, 1 - 21.75x17.5
1 - 25 inch x 19.5 inch piece of 3/4 plywood.
11 - metal corner brackets.
19 - 1/4-20 x 1 inch bolts with nuts.
11 - 1/4-20 x 1.75 inch bolts with nuts.
2 - 3 inch x 3 inch 3/4 plywood pieces.
Tumbler
5 feet of 1/4-20 threaded rod.
16 1/4-20 hex nuts and flat washers.
3 - 1/4-20 step bolts with wing nuts.
24 inches of 3/8 threaded rod.
6 - 3/8 nuts.
1 - 6 inch piece of flat bar for crank handle.
1 - 3/8 x 2 inch bolt with 4 nuts.
3/8 inch wide pvc tape..or foam tape.
small piece of 1/4" plywood. 6.5" x 6.5"
screen mesh of your choice. i used silk screen that is 125 mesh from this site www.poconoscreen.com
so, to build the box you just cut your plexiglass...be sure to notch out a section in the bottom of the piece you plan on using for the front so you have room to slide your drawer out...and then drill some holes and use your angle brackets and 1 inch 1/4-20 bolts to hold it all together...like this..
then get your 25x19.5 piece of plywood and attach your plexiglass box to the plywood using the remaining brackets and the 1.75 inch 1/4-20 bolts...like this..
next get your 3x3 plywood blocks and drill 4 1/4 inch holes near the corners of each block, and drill a half inch hole in the center of each. then on one, cut a slot to the hole that you drilled in the center. get them centered on the inside of the left and right sides of your plexiglass box and drills some holes and bolt them in with your 1/4-20 bolts. then drill a hole through the plexiglass where you drilled the center hole on the non-slotted block...they should look like this when done...
here's a pattern i drew for the blocks.
at this point the box is complete, and should look something like this..
now for the tumbler. start by drawing your pattern for the end caps. mine is 8 inches in diameter. here are the patterns i drew on autocad..i kept them original size you may be able to print them out and use mine.
once you get those cut out, drill all the smaller holes on the pattern with a 1/4 inch drill bit and drill the bigger center holes out with a 3/8 or 1/2 inch drill bit. then put the 3 step bolts in the holes on the end cap that you cut the center out of, they are used to hold the lid on. then put a 5 inch length of your 3/8 threaded rod threw the center hole you drilled in the other end cap and secure it with nuts and washers on both sides. then cut your 1/4-20 threaded rod in 4 equal length pieces. put the two end caps together with your threaded rod, washers and nuts. i put a nut and washer on the inside and outside of the end caps so it all stayed solid. it should look like this...
next, the lid. i cut my lid out of 1/4 inch plywood..just a scrap piece i found laying around. cut a piece of 3/8 threaded rod to a length of 3 inches. put it threw the center hole in your lid and secure it with nuts and washers on both sides. here is a front and back shot of my lid.
then the fun part, stapling your screen to the tube you just built. it would be easier with 2 people, but like everything else, i did it by myself and it took a while lol. take your foam tape and run it around the edges of your end caps, you can see it in the pictures above, its the black between the screen and end caps. then cut out your screen and starting from one end, staple it on there, pull it tight and staple it all the way around. after you get it stapled on, get yourself a needle and thread and sew the seam of the screen together. then screw your lid on using the wing nuts and your tumbler tube is complete...it should look something like this...
then i made my crank handle, its real simple. just a piece of flat metal with a hole drilled at both ends, one end has a 8.5 inch length of 3/8 threaded rod attached to it and the other has a 1/4-20 bolt coming out of it for something to grab onto and turn the crank. i got stumped for a bit on how to make it easy to disconnect the crank handle and pull out the tumbler and i came up with this. its a piece of aluminum rod that i drilled the center out of so it could slide over the 3/8 threaded rod coming out of the tumbler and the crank handle. then i drilled holes through the aluminum piece and threaded rods at the same time and threw some hitch pin clips in there..it all looks like this...
here is the other end when the tumbler is in the box and ready to go. and the crank installed...the black tape is on there cuz it was squeaking when i turned the crank..
just load it up with frozen trim and/or bud, screw the lid on, put the tumbler in the box and connect the crank with the clips and you're good to go. i plan on getting a bbq rotisserie motor when i re-build the box...turning it by hand kinda sucks...
if i forgot to mention something or you have any questions, dont be affraid to say something...i smoked a lot of weed while writing this up so there may be some things i missed or things that dont make sense lol
Attachments
-
 full 1.jpg33.2 KB · Views: 1,650
 -
 full 2.jpg35.4 KB · Views: 1,651
 -
 corner bracket.jpg50.5 KB · Views: 1,629
 -
 base bracket.jpg53.8 KB · Views: 1,621
 -
 slotted block.jpg40.6 KB · Views: 1,626
 -
 crank side block.jpg46.5 KB · Views: 1,619
 -
 at this point.jpg45.1 KB · Views: 1,626
 -
 other end.jpg79.8 KB · Views: 1,642
 -
 end 1.jpg81.1 KB · Views: 1,633
 -
 end 2.jpg66.3 KB · Views: 1,640
 -
 lid front.jpg54.5 KB · Views: 1,620
 -
 lid back.jpg62 KB · Views: 1,616
 -
 seam.jpg38.6 KB · Views: 1,610
 -
 lid on.jpg51.4 KB · Views: 1,621
 -
 complete tube.jpg38.9 KB · Views: 1,621
 -
 crank attached.jpg59.5 KB · Views: 1,618
 -
 crank detached.jpg53.8 KB · Views: 1,606
 -
 crank.jpg107.2 KB · Views: 1,606
 -
 slotted end in.jpg51.5 KB · Views: 1,603
 -
 crank installed.jpg73.6 KB · Views: 1,606