DIY design build throwdown

SSGrower

Well-Known Member
Design continues to develop. Light #3.

Improvements: modular, 2-4 screws for any piece. Open design, but with good tight wiring (to be done). Plenty of room to add the breakout box (which will hold fan driver and wagos for all the connections), and also room for a dimmer (on order).. EDIT: self tapping aluminum screws for most of the structural, 6mm screws for lighting and ballast.

I'll send pics when done. I think this is the new design though.

Not sure if I should bother with the reflectors I got from Kingbrite.. But they are tapped and ready for them. Light test will determine their usefulness.. Also pending.

This is HLG185c-c1400 with 4 new Cree from Kingbrite on Ali.

Heatsinks and fans sourced from recycler $20. Aluminum bar + $15. Fan and led driver: $90. Chips: $225. Misc: $10. $360ish.
Nice, at one point I ran into an issue having the one eyelet because unless perfectly balanced It had the tendency to rotate or tilt. Be interisted to see how it works for you. Switched to two point on either end fixed it for me, but your setup looks better balanced than mine was.
Ran into a bit of an engineering block the last few days but had a breakthrough last night. I think my light mover is going to rival @ttystikk for inventive uses that objects were never intended for.
 

MasterpieceNutes

Well-Known Member
unless perfectly balanced It had the tendency to rotate or tilt
Happened to me on first rail I made. I figured it out though. You just need the eyelet to be above the center of gravity. Basically, just move your eyelet up higher (above where weight is) if it isn't.
With all the heat sinks riding the lower side, the c.o.g. is low on this build. I would make a few more just like this, but these were the only 4 heatsinks like this in the recycle bin.. Doh.

Necessity is the mother of invention though. Trying some JB weld on aluminum for the next batch of heatsinks which don't even have any screw holes tapped in em'. Pics tomorrow.

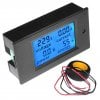
I'm wondering if I can add one of these to the next build. I think if its relayed in after the dc conversion we'd get the readings for all of the chips in the array, right? Think it will measure real mA ? Or will it just look at wattage and volts and spit out a computed amperage? Anyone try this? Seems like too much fun NOT to do for $10ish.


http://www.ebay.com/itm/DC20A-100V-LCD-Digital-Volt-Voltage-Watt-Current-Power-Meter-Ammeter-Voltmeter-s-/172099849090
 

Attachments

HydroRed

Well-Known Member
the CL2R 'doorbell' cable I have is rated for 300V....of course i looked....
How do I know what the rating is for the wire? I bought the red/white 20ga wire off of the spool-by-the foot from my local hardware store and there were no markings for max voltage.amperage. I got it to use on a 4 cob cxb3070 build with the hlg-185H-C1400B. Should I be using a different wire to connect the cobs?
 

BOBBY_G

Well-Known Member
it should be printed on the cable. mine says CL2R among other things every few inches.

i got the doorbell 18-2 at home depot. it was listed for 300V on the fine print on the back
 

HydroRed

Well-Known Member
No writing on mine which I believe was due to being bought "by the foot" off of a spool.
I had assumed that all of the 20ga solid would hold the same load values so Im glad I asked.
These are the holders I have and wasnt sure if 18 ga would work in the quick connects.
http://www.pacificlightconcepts.com/product/bjb-3070-holderadapter/
If 18ga will work, I'll just go get some 18ga solid rated for my project since I had no issues finding it (with values written on the wire) vs the 20ga solid unmarked doorbell wire.
 

BOBBY_G

Well-Known Member
i have the ideal holders for the 3590s which can take up to 18. ask greengenes about 18ga in yours, it might be ok-but-slightly-less-than-optimum.

otherwise you can find rated wire online

difference is insulation, not the conductor
 

Fastslappy

Well-Known Member
i have the ideal holders for the 3590s which can take up to 18. ask greengenes about 18ga in yours, it might be ok-but-slightly-less-than-optimum.

otherwise you can find rated wire online

difference is insulation, not the conductor
Has to do with the melting temp of the jacket/insulation Cree calls out 18 gauge stranded with a 300 volt rating with that Ideal holder in their how-to video
 

SSGrower

Well-Known Member
No writing on mine which I believe was due to being bought "by the foot" off of a spool.
I had assumed that all of the 20ga solid would hold the same load values so Im glad I asked.
These are the holders I have and wasnt sure if 18 ga would work in the quick connects.
http://www.pacificlightconcepts.com/product/bjb-3070-holderadapter/
If 18ga will work, I'll just go get some 18ga solid rated for my project since I had no issues finding it (with values written on the wire) vs the 20ga solid unmarked doorbell wire.
I have 2 different 18 ga wires the thinner insulation one fits the ideal holder better. If your wire isn't marked it's probably automotive or something similar, likely less than 24v and since there is no printing you have no idea what the insulation will do at elevated Temps close to the cob.

I think the thicker insulation was 600v lamp wire.
 
Last edited:

HydroRed

Well-Known Member
I was informed that the newer style BJB3070 solderless holders accept 18ga solid/stranded wire. Im gonna scrap the unmarked wire and do the 18ga 300V.
Thanks again for the help.
 

SSGrower

Well-Known Member
Happened to me on first rail I made. I figured it out though. You just need the eyelet to be above the center of gravity. Basically, just move your eyelet up higher (above where weight is) if it isn't.
With all the heat sinks riding the lower side, the c.o.g. is low on this build. I would make a few more just like this, but these were the only 4 heatsinks like this in the recycle bin.. Doh.

Necessity is the mother of invention though. Trying some JB weld on aluminum for the next batch of heatsinks which don't even have any screw holes tapped in em'.
I give up too easy sometimes and continually :wall: at others wtf? In that same situation I just probably spent more time and money f'n around for a solution then just ended up buying more eyelets and put em at the corners.

Mp looks to me like your design would accommodate the hs sliding back and forth allowing a customization of light distribution basedon the ever changing needs of managing growth? Just an idea nothing else.

BTW I'm going to go eat some humble pie now and edit the opening post because clearly I didn't dig deep enough to find you rats.:peace:

OK so apparently I can't do that right either, can only edit posts for day......back to the drawing board on eating pie but I'm still an expert at being an ass!
 
Last edited:

SSGrower

Well-Known Member
Build update finished light 3 yesterday and light 4 today. The green legs on 4 will stand the light if I need to set it down while moving and double as the fan mount, I cut extra pieces and will mod my 3rd light which the fan is just kind of held in place on the cables. The fishing reel light mover (just up and down) is not ready for install and will be placed on back burner but no other use for the 250 yd of 65lb test braided line so another someday project. o_O

On another note the rebuilt light I notice when it is turned out there seem to be dark spots (individual leds it appears) maybe as many as 20 as the rest of the leds gradually dim down over a second or two. Also sort of in passing while testing wattage of the various fixtures it seemed to be running at 40 watts or so (36v x 0.6) x 2 led in parallel = 42 watt plus 2 cooling fans (this would be closer to the original after the mod). One of the leds did slide sideways in the holder at one point. Have I burnt out part of the led?

modular lights1.JPG modular lights2.JPG modular lights3.JPG modular lights4.JPG modular lights5.JPG

Aluminum sheet to make reflectors any suggestions on where to find a cutout template so I can form a 90 to 100 deg reflector?
Another thing to add to the list of things take care of - breakout box for fans and clean up the wiring.
 
Last edited:

ttystikk

Well-Known Member
Nice, at one point I ran into an issue having the one eyelet because unless perfectly balanced It had the tendency to rotate or tilt. Be interisted to see how it works for you. Switched to two point on either end fixed it for me, but your setup looks better balanced than mine was.
Ran into a bit of an engineering block the last few days but had a breakthrough last night. I think my light mover is going to rival @ttystikk for inventive uses that objects were never intended for.
Why, thank you Sir. I consider that high praise!
 

sixstring2112

Well-Known Member
Happened to me on first rail I made. I figured it out though. You just need the eyelet to be above the center of gravity. Basically, just move your eyelet up higher (above where weight is) if it isn't.
With all the heat sinks riding the lower side, the c.o.g. is low on this build. I would make a few more just like this, but these were the only 4 heatsinks like this in the recycle bin.. Doh.

Necessity is the mother of invention though. Trying some JB weld on aluminum for the next batch of heatsinks which don't even have any screw holes tapped in em'. Pics tomorrow.

I'm wondering if I can add one of these to the next build. I think if its relayed in after the dc conversion we'd get the readings for all of the chips in the array, right? Think it will measure real mA ? Or will it just look at wattage and volts and spit out a computed amperage? Anyone try this? Seems like too much fun NOT to do for $10ish.


http://www.ebay.com/itm/DC20A-100V-LCD-Digital-Volt-Voltage-Watt-Current-Power-Meter-Ammeter-Voltmeter-s-/172099849090
if we can figure out a way to use those and have them be somewhat accurate,i would def slap one on each build just for the fun factor
 

Abiqua

Well-Known Member
Has to do with the melting temp of the jacket/insulation Cree calls out 18 gauge stranded with a 300 volt rating with that Ideal holder in their how-to video

Those ideals still like 18 gauge solid strand imho...I will not even use a strand with Ideal, ever. THe BJB holders seem to like both and aren't fussy over any particular wire...in fact since I was remounting a bunch of diodes...I went to fuck around with Ideals again, and 18 / 20 gauge strand pull out, like feathers from air.......

I wish ideal would re think their design a bit....compared to the BJB's....they aren't even close :peace:
 
Top