Kitty's 6000 Watt Ebb & Flo, pictures galore, continually updated never ending oh no!

do you expect the roots to develop in 12/12? I used to transplant rock wool cubes into my hydroton buckets at the time I was flowering and when I harvested there where almost no roots! If I had to do it again with buckets and hydroton, I'd veg in the hydroton...

I fully expect roots to continue developing as the plant grows upward most of the way. Generally after 3rd week of flower I could care less about root nutrients and more looking for top growth.

I wish there was a way to seed in Hydroton, but its very risky for the plant in its immature state. There's some guy with some pics showing it worked, followed by a thread 30 days after where his plant was dead. The rockwool is only the 1.5" cubes, very small. Generally when I water the plants it'll barely touch the rockwool since its filling from the bottom up not watering from top down. Its nice to not have algae when using rockwool. =)
 
i have a 5gallon bucket with hydrotron covering my rockwool cube. its really just a bubbleponic system. im using a fishtank air pump and an air stone and its making my plant grow crazy
 
I dont' think I follow, you start your plants in rockwool cubes then veg for only a couple days then flower? What I mean by veg in hydroton is to have your buckets stay in the veg light cycle. YOu don't have to start your seeds in it. You can put the rockwool cube in like you do, but let them veg and develop roots before going to 12/12.

I may be confused. I was under the impression that you just put the plants in the hydroton and are flowering after a few days.

While the pictures show pretty clearly exactly how I do things here it is for the thread-reading-lazy..... :) 1" rockwool cubes from seed, wait a week for them to root, then put rockwool cube and plant into hydroton filled bucket for ebb/grow system. I veg and flower in Hydroton, the rockwool only is just for the first week till roots are present. My plants clearly were vegged before flowering, close to 4 weeks. Flowering began 5 days ago. :)
 
I have read the entire thread maybe I'm just being dumb. I thought that you said you transplanted to larger pots then flipped the lights to 12/12 after only five days in the larger pots. I may have confused another thread or something. I was simply saying that I'd give the plants more than five days in their new containers before flowering. I'm just confused...
 
I have read the entire thread maybe I'm just being dumb. I thought that you said you transplanted to larger pots then flipped the lights to 12/12 after only five days in the larger pots. I may have confused another thread or something. I was simply saying that I'd give the plants more than five days in their new containers before flowering. I'm just confused...

No worries! :) I will begin vegging in one gallon buckets for the next batch, then transplanting them to 3.5 gallon buckets when the fill up the 1 gallons. Transplanting in Hydroton seems to be rather simple, just fill bucket with water, plant lifts out easily, put it in another bucket of water, fill with Hydroton, drain. Should be pretty easy! I dont know my time table for this, or how long the 1 gallon buckets will last, but time will tell soon. Just got a ton of new buckets in todays mail, so it'll be picture update time soon too. Have a batch of clones rooting as well and a lot of construction to do. =)
 
Just took a bunch of photos........ Back after dinner. You'll be surprised to see what's going on with the topped vs untopped............! While your here why not check my sig for my glass pipe making thread, just updated a minute ago. Plant pics in an hour!

attachment.php


https://www.rollitup.org/toke-n-talk/320294-trying-my-hand-glass-pipe.html
 
Its been a little while since my last picture update. RIU was sucking it hard on 4/20 and it took a while for the site to come back! Glad it is. :)

attachment.php

Here we go. A is of course topped, B is untopped plants. Notice how much more uniform and even the topped plants are versus the untopped plants. In the far back right, one of them is nearly 28 inches tall, the rest are about 20-22" tall.

attachment.php

The Topped 9. Light A.

attachment.php

Up close, Light A

attachment.php

The Untopped 11, Light B. Remember, its still 9 plants under the light, the other two are "between" A & B.

attachment.php

Light B again, untopped plants. Notice the mammoth in the back. The first 5 nodes are single branched, after that it finally unmutated itself to create alternating dual branch nodes.

attachment.php

Nifty canopy shot, I guess.

attachment.php

The grow calendar, showing that we're on DAY 6 of flowering.

attachment.php

Upgraded some of the tubing to clear. Some say clear may promote algae, I say hogwash, it moves water too fast to get created. It helps me see if theres junk in the lines.

attachment.php

Another shot from the A side

attachment.php

The veg room, got about 15 or so clones in there for the last 4 days rooting away. So far no roots are showing but they'll get there. Seedlings are looking good too. On the left you'll see the previous mutant that was pulled from the flower room a week ago, its slowly growing. I dont know why I keep it still, just no real reason to kill it yet.

attachment.php

Oh my, the projects continue. I'm making a 1 gallon ebb & flow hydroton kit that will facilitate transplanting from a veg to flower room. More to come on that later.............

Oh yea, ya see the glass pipe thread too? :)
 

Attachments

  • growmisc 042.jpg
    growmisc 042.jpg
    76.4 KB · Views: 437
  • growmisc 043.jpg
    growmisc 043.jpg
    56.6 KB · Views: 434
  • growmisc 044.jpg
    growmisc 044.jpg
    108.8 KB · Views: 435
  • growmisc 045.jpg
    growmisc 045.jpg
    76.2 KB · Views: 432
  • growmisc 049.jpg
    growmisc 049.jpg
    54.8 KB · Views: 426
  • growmisc 048.jpg
    growmisc 048.jpg
    39.5 KB · Views: 427
  • growmisc 047.jpg
    growmisc 047.jpg
    67.7 KB · Views: 432
  • growmisc 046.jpg
    growmisc 046.jpg
    76 KB · Views: 432
  • growmisc 050.jpg
    growmisc 050.jpg
    73 KB · Views: 427
  • growmisc 051.jpg
    growmisc 051.jpg
    57.1 KB · Views: 428
  • growmisc 052.jpg
    growmisc 052.jpg
    51.3 KB · Views: 429
Hi kitty, put your aerocloner up on a bucket to get it closer to your flouro... The clones need warmth as well as light... :-) Just a lil tip...:-)

Your plants are looking amazing, what is your watering schedule, some of the leaves are starting to show slight signs of water stress...By that I mean slightly overwatering...

Here is a pic of my current grow...:-)

laceygirl-albums-super-lemon-haze-journal-picture894300-14-days-into-flower.jpg


Laceygirl...
 
Hi Lacey.... :)

Watering 4 times a day right now, about 2.5 hours apart, beginning when the lights turn on. No watering when they are off, of course. What signs of overwatering did you see? I must be missing it, they seem to look good to me. The clone distance is a little far primarily because the T5 is a very bright one, something like 400 watts. If they were under the little 96w T5, they'd be super close! I keep them at this distance so water spray stays off the lights when I mist them and because of the wattage.

Strangely, this is my first time cloning. Never had to do it before, usually would purchase clones that were already vegged a week in the past. We'll see!!!

Thanks everyone...
 
A quick "DONT BUY" from Nirvana -- their NYPD seeds are not feminized as advertised.

Here's two from their current batch of New York Power Diesel FEM seeds out of 5 planted:

attachment.php

Day 8 of flowering, clearly not a female.


attachment.php

A different NYPD plant, day 8 of flowering again, and clearly not a female.

So that's 2 plants out of the farm, now its 9 vs 9. :)
 
i use a couple high output t5s (HO T5), and I keep them right on top of my clones, and they get super bushy. Id say 4-6 inches to be safe. You got em way to far away. Other then that your room looks great. Like it.
 
5 days since the last photo update. Plants have grown about 8" or so since the last pictures.


attachment.php

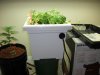
Today lets start in the veg room.


attachment.php

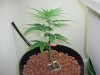
The mutant is still growing slowly. :-)


attachment.php

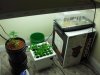
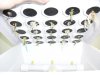
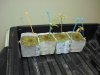
This is my first time personally clipping clones. They look pretty rough on the top of the cloner. They are still about 5" from the light, misted twice to three times daily with just fresh water........


attachment.php

Underneath though, they are rooting pretty well. Yesterday I took one and put it in a Hydroton bucket without any rockwool (dont intend to use the cubes, just go in the pots. This is right, isnt it? Cant seem to find a real answer). The one I put in the bucket wilted overnight so I figured roots needed to be larger and put it back in the cloner. We'll see how they go.


attachment.php

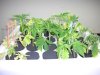
The seed heating mat cooked the shit out of the seeds. These are the best 3 left out of 20+ planted. I'm not sure what went wrong with the mat, but its most certainly burning hot to the touch is not good. That cost me a few hundred bucks in seeds. Bastards. But hey, its under warranty. ;)


attachment.php

So since the seeds suck.........

Dr Greenthumb genetics arrived yesterday (4 day delivery time) and they are now in the towels germinating. I peeked at the time of the photo and they are all just starting to show their taproots.

--> OG Kush
--> Iranian G13
--> Cindy 99

I think this will make for a nice genetics upgrade over Nirvanas over-used strains. I swear next time someone asks for "purpz" I want to slap em in the face with a raw fish.


attachment.php

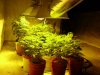
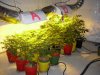
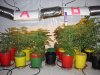
Remember, A is topped, B is untopped.


attachment.php

A


attachment.php

B


attachment.php

Notice how even the toppe plants canopy is, and how wildly out of control it is on the B light. I tied the back right plant down after taking the photo, it was growing into the glass.


attachment.php

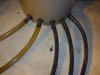
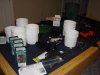
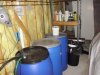
Got 2 more barrels in anticipation of the next two grow lights.


attachment.php

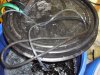
Also upgraded the air pumps from a 6w unit to a 24w unit. 24w is still lower than I'd like, so I upgraded the airstones to:


attachment.php

These are flexible air stones. With substantially more surface area of regular air stones, they clog less and keep bubbles everywhere instead of just at the stone.
Easy to clean, cheap, I like em!


attachment.php

If your reservoir doesnt bubble at least this much, you need a stronger air pump!


attachment.php

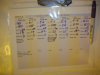
This weeks chart........... Added water too, 15 gallons or so. PPM dipped to 880, so I added nutrients too, bringing it back to ~1050.


attachment.php

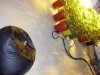
New lounge chair. Nothin like a black bean bag, a bat pipe, and a flick-a-bic while watching the kids.


attachment.php

Canopy of A


attachment.php

Canopy of B

......that's it for now! Any suggestions or advice on the clones?

Thanks!!
 

Attachments

  • grow 004.jpg
    grow 004.jpg
    41.3 KB · Views: 503
  • grow 003.jpg
    grow 003.jpg
    62.7 KB · Views: 504
  • grow 002.jpg
    grow 002.jpg
    46.7 KB · Views: 504
  • grow 001.jpg
    grow 001.jpg
    45.2 KB · Views: 503
  • grow 005.jpg
    grow 005.jpg
    50.6 KB · Views: 501
  • grow 006.jpg
    grow 006.jpg
    45.7 KB · Views: 501
  • grow 007.jpg
    grow 007.jpg
    83.9 KB · Views: 503
  • grow 008.jpg
    grow 008.jpg
    88.3 KB · Views: 502
  • grow 012.jpg
    grow 012.jpg
    49.5 KB · Views: 501
  • grow 011.jpg
    grow 011.jpg
    60.4 KB · Views: 500
  • grow 010.jpg
    grow 010.jpg
    82.7 KB · Views: 501
  • grow 009.jpg
    grow 009.jpg
    98.8 KB · Views: 505
  • grow 013.jpg
    grow 013.jpg
    84.7 KB · Views: 502
  • grow 014.jpg
    grow 014.jpg
    117.3 KB · Views: 503
  • grow 015.jpg
    grow 015.jpg
    38.2 KB · Views: 498
  • grow 016.jpg
    grow 016.jpg
    61.7 KB · Views: 502
  • grow 017.jpg
    grow 017.jpg
    117.5 KB · Views: 500
  • grow 018.jpg
    grow 018.jpg
    92.4 KB · Views: 499
this is when the fun begins!!! im still waitin for my clones to take off before i post more pics. and as for lookin pro, ur setup looks pro too. when u get it fully up and running it will be sick. love the little chart haha..wish i could do something like that, but im super stuck in my ways and habits. keep up the good habits!! ;p
 
You need to keep highly reflective panels touching perimeter plants. It will increase light received by the plants 10 fold. Watts mean nothing unless the light is configured efficiently.

My indoor garden consists of large reflecting panels that can be picked up and placed against the plants according to the ever changing garden footprint, even the floor is painted with a brilliant white paint.

As an aside, cabinets with fixed reflective walls don't cut it nor do open sides where 50% of the light is wasted.

It's all about "buying light".

Good luck,
UB

I was flowering in a large room with only a 4x8 tray. There were three sides of the tray very close to the walls. The one side not near a wall had popcorn on the sides, yet the other three produced nice nugs. It's the grow in my avi.
 
Back
Top