Spida's Micro Grow

"SICC"

Well-Known Member
DWR - I have 5 plants going right now, what I meant was I was going to try and top what you yielded in my whole box, not just one plant. Haha. Sorry that was misleading. I wanted to show, that a small box could still get great yields.

N00b - A micro grow is just a grow that is done in very small/restricted space. For example, not a big grow tent, or a 4x4x8 box. Keeping it small/stealthy. :) On ICMAG they had a competition who could get the most yield from growing out of a shotglass, and one guy got 7 or 8 grams out of a shotglass. Haha. That's what you call a SUPER micro grow.


yea i was the pics from that competition shit was crazy :D
 

spida

Well-Known Member
Haha. Once I get my first grow out of the way, we should start something like that SICC. Would you be in on it? Only instead of shotglass, do chew cans. :) Hahah. That would be neat to see someone set up a shot glass or chew can hydro set-up. Haha.
 

DeweyKox

Well-Known Member
Nice grow op. Hope to see upgrades in nutes and lights down the road and see you progress in your harvests. Always try and step it up a notch at least once a month, till you get all the tools for your grow. Keep up the good work.
 

spida

Well-Known Member
Thanks man. most definitely will have light upgrades, but i'm fine on nutes for right now. Next grow might get the whole fox farms line.
 

spida

Well-Known Member
Hey guys I have a load of pics from when I made my super quick/ghetto light holder. Will be making a DIY reflector if I want to. If you want to see pics, I can post em up, if not, then I won't bother. :bigjoint:
 

GypsyBush

Well-Known Member
Just checkin' in Spida... I got a bit to catch up... but I'll catch up...

Show us some ghetto pictures...:-P

Gypsy...:bigjoint:
 

spida

Well-Known Member
Aight. Once I eat dinner I will post up some pics. Shouldn't be too long now. Hour at the most until my ghetto update. :)
 

spida

Well-Known Member
Aight. Once I eat dinner I will post up some pics. Shouldn't be too long now. Hour at the most until my ghetto update. :)

Thanks for joinin in my grow gypsy.
 

spida

Well-Known Member
:leaf: 
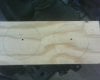
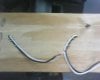
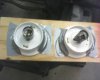
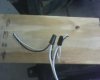
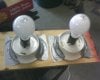
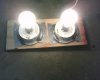
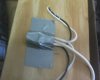
Building the Ghetto Lights
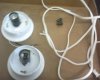
 :leaf:
Partial Temporary Set-up

Alright,
so this is the kind of temporary light set-up as of now. It was really cheap, but works, so hey no complains, so don't tell me oh its not going to work blah blah blah. It works perfectly fine, and if you don't like cheap DIY stuff, then might as well skip this whole post all together. I will do it as a Tutorial/Sharing type post, so be prepared.

Materials:
- Plywood Rectangle 15" L x 6" W
- (2) Glass Shade Holder Kit $9.98 for two
- Extension Cord
- Electrical Tape
- Wire Strippers
- Drill and 7/32 Drillbit
- Staple Gun (Optional)
- Duct tape (Or Screws, but I didn't have the right size)
- (2) Wire caps (Don't know name, but you put it on top of the wires your connecting and twist, and it twists them together and holds them)

So, this is how I did it with what I had. It could be done a lot better, but I'm lazy, and this works, so hey, why not. The finished version will have 4 hooks screwed in on top so I can hook up a chain to it, and so its move-able.

Picture 1 is the two glass shade holder kits, the extension cord with the end chopped off, and the two wire caps.

Step 1 - Take the extension cord and cut off the female/(part you plug stuff into) end, and strip about 1/2 an inch of wire out on the end. Refer to picture 1.

Step 2 - I drew circles around the outsides of the light holders, and I measured out to the exact center and drilled out holes with the 7/32" bit. This is where the wires will be put through. Refer to picture 2.

Step 3 - Put the wires through the hole you drilled out. I stapled them down, so they would stay tight and hold the light in place, and make sure it wouldn't fall. I would have screwed the light fixture down, but couldn't find the right size screws. Refer to picture 3.

Step 4 - I duct taped the light fixtures down to keep them secure, because I didn't have screws. Refer to picture 4.

Step 5 - Next match up the black wires of both of the light fixtures and match it with one side of the extension cord. Put the wire cap on top and twist it down tight. Do the same with the white. Refer to picture 5.

Picture 6 - Putting some halogens that were next to me in to test it out to see if it works.

Picture 7 - It WORKS! :lol:

Step 6 - Put electrical tape over the exposed wires if any. Refer to picture 8.

To hold the wires down, I put duct tape on it, but it wasn't sticking, so I'll have to figure out something new soon, but do not know yet. Refer to picture 9.

Alright, that's it guys. Will post some pics of it in use when the box is done. Hope you like seeing the progress of this. I'm trying to make every update that I make as neat and as organized looking as I can make it so you guys can know exactly what I'm doing, and exactly how I'm doing it. Give me some feedback if there is anything you would like to see different or changed or anything along those lines. Just drop me a PM, and we'll see what we can do. :) Enjoy. :leaf:


Attachments

"SICC"

Well-Known Member
I personally like ghetto 8)

lookin good so far, cant wait to see it in action, best of luck :leaf:
 

spida

Well-Known Member
Thanks Sicc. I personally don't mind ghetto, and prefer it, as long as it looks somewhat organized ya know?
 

DWR

Well-Known Member
I think you didn't read his thread from the beginning... but here is a quote from the first page...
^^ Yeah i did read it from the beginning.. they just look like normal light bulbs...


;) hehe........ And u'd rather get a bigger cfl....... a 125w one if your gona use cfl's.... more lumens in less space..

but your gona need an e-40 socket..... Hmmmmm, i dont know dude.. spida i just wana help not diss you or anything...


:hug:
 

GypsyBush

Well-Known Member
I wish he'd go get a cool tube and a 400HPS....

BTW is that what you have in your tent?

Nice Grow... best of luck...

HTG fuct up my order, but I am waiting on the cooltube and a 600...
 
Top